fbcode

BTO Kitchen Lighting Guide Singapore: Task & Ambient Layers for Perfect Mood and Function

Many new BTO owners walk into their kitchen for the first time and feel the same thing.
The space looks neat, but the light feels dim or too harsh.You might try turning on every switch in the room, yet the shadows on the countertop still make chopping hard.
You may even notice how the stove area feels dull while the sink feels bright for no clear reason.

When a homeowner plans BTO kitchen lighting layers for the first time, the entire process can feel confusing.
Some owners tell us they worry about picking the wrong fixtures, while others share that they do not know how to mix task and ambient lights in a small kitchen.

These worries are common, and they are real.
Your kitchen is where you prep food daily, where you move quickly between zones, and where your lighting must support you without getting in your way.

At Elpis Interior, we guide BTO owners who need clarity on functional lighting for cooking and daily routines.
Our role is to show you how to build lighting layers that feel natural, look warm, and work well in compact spaces across Singapore.

This guide follows that same approach.
It is written for you, your kitchen, and the decisions you need to make with confidence.

Design a Home That Hugs You Back

More than walls and furniture — it’s where your kids grow up, where laughter echoes. Let’s plan a space that feels like home. Talk to our designers today.

Elpis interior Design polaroid

Our Partners

Why Lighting Matters in BTO Kitchens

Many Singapore BTO kitchens are compact.
The ceiling is low, the walkway is narrow, and the working space varies from 2.2 to 3 meters.

In such layouts, lighting becomes part of how you feel in the kitchen.
If the room is too dim, you strain your eyes every time you prepare food.
If the light is too cold, the kitchen looks sterile.
If the light is too warm, you lose clarity on your chopping board.

We often hear from owners who moved into their BTO and realised that the default ceiling lights did not help them see what they were doing.
It was only after cooking one or two meals that they noticed shadows on the sink or on the worktop.

Lighting designer teams also share how many kitchens need proper zoning.
Singapore units are compact, so lights must be placed with intention.
If a contractor installs ambient lights without task lighting, you get glare but poor visibility.
If an electrician fits under cabinet task lights without understanding the overall brightness, you end up with uneven lighting pockets.

Studies on residential lighting recommend a balanced combination.
Task lighting should deliver around 500 lux for food preparation.
Ambient lighting should stay moderate to create a calm base.

When you follow these basic rules, the kitchen looks brighter, feels more open, and supports safe cooking under any condition.

You can also explore how lighting connects with layout choices in our
BTO Kitchen Design Ideas.
These examples help you see how both design and light work together in real homes across Singapore.

If you ever felt unsure about how bright your kitchen should be, you are not alone.
This is where lighting layers come in and give you clarity.

Task vs Ambient Lighting Explained

Task lighting is the focused layer.
It lights the areas where you chop, wash, cook, and plate food.

This is the lighting layer homeowners rely on most.
When you stand at the worktop or sink, you need the surface bright enough so you see every detail.

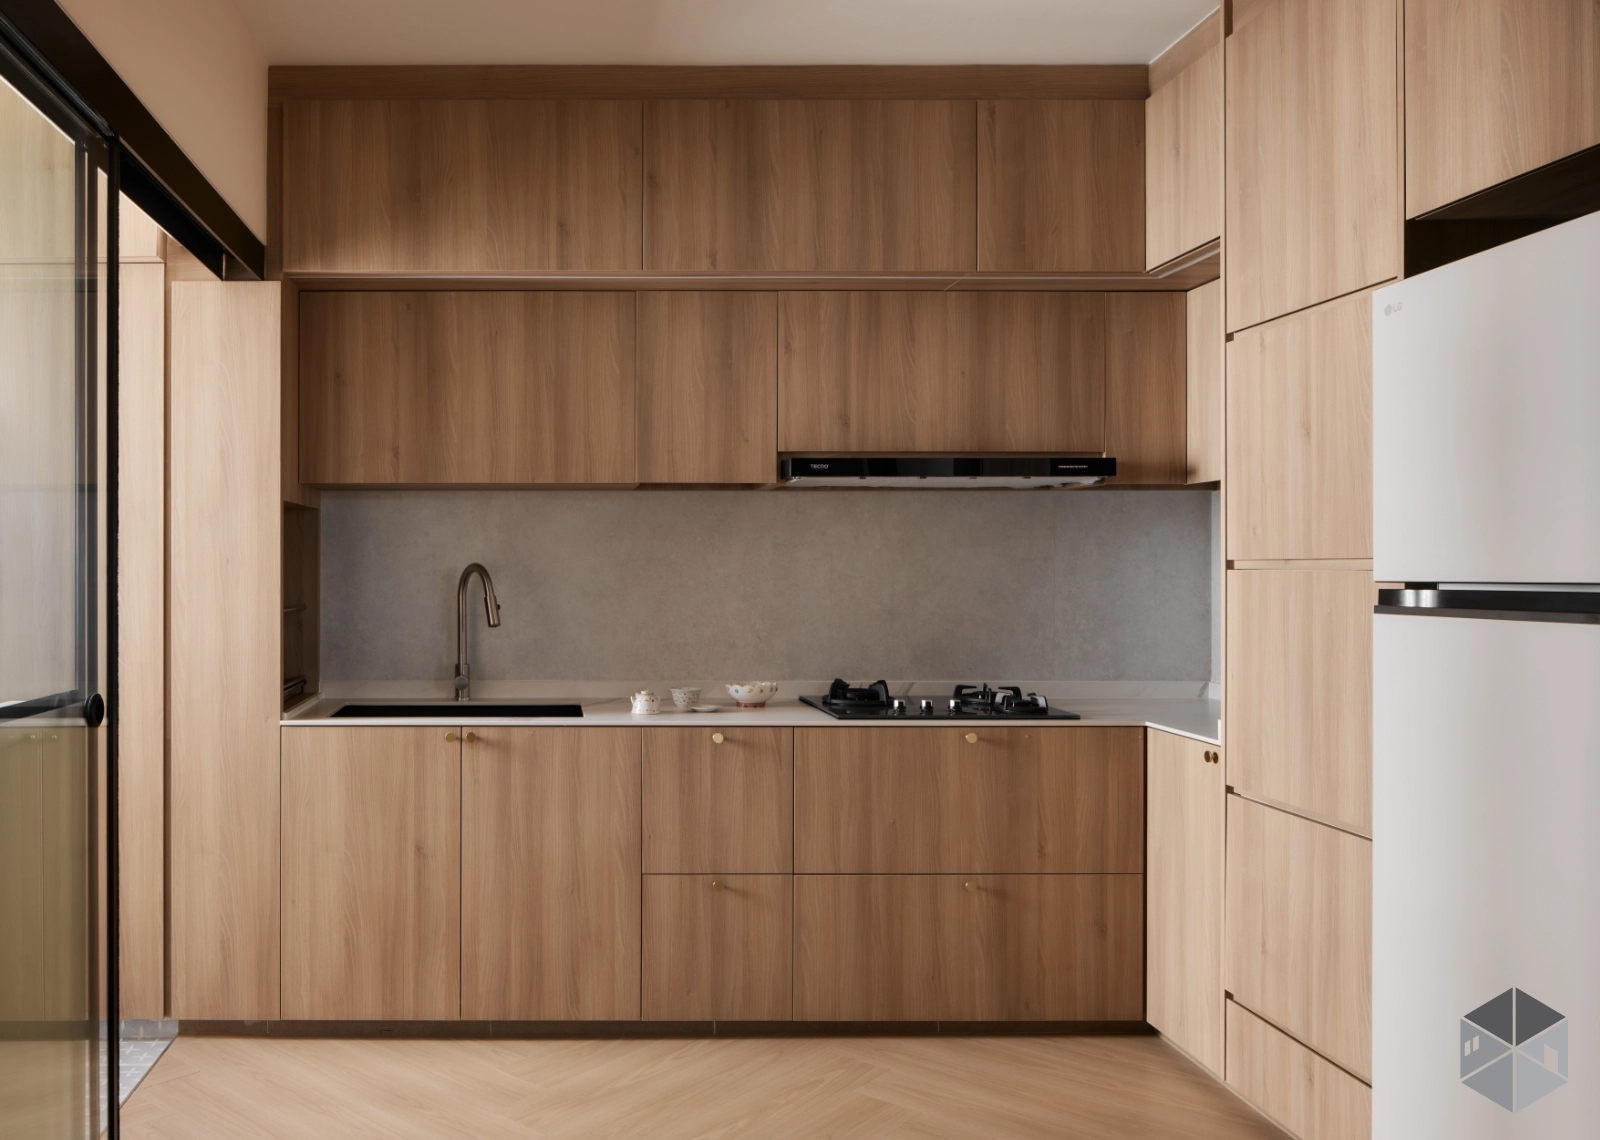
A lighting designer installs task lighting under the upper cabinets to remove shadows.
Your electrician may fit under cabinet task lights as LED strips or linear bars.
You can also place spotlights or a row of track lights to brighten narrow zones in compact kitchens.

Ambient lighting is the base layer.
It creates the general brightness of the kitchen without focusing on specific tasks.

A contractor installs ambient lights at the ceiling using recessed downlights or panel lights.
Many BTO owners today prefer warm white light for ambience, while others choose cool white for a clean look.
A user chooses warm or cool lighting temperature based on mood and cooking habits.

Both layers matter.
When you balance them, you get a kitchen that feels warm but still clear, bright but not harsh.

Here is a clear look at how both layers differ.

Comparison Table: Task and Ambient Lighting Features

Feature Task Lighting Ambient Lighting
Purpose Brightens work areas for chopping, washing, and cooking Creates overall brightness and mood
Brightness Around 500 lux for safe preparation Moderate, even coverage
Typical Fixtures Under cabinet LEDs, track lights, bar lights Recessed downlights, LED panels, flush mounts
Placement Directly above worktop, sink, and stove Evenly across ceiling
Effect Improves visibility and reduces shadows Makes room feel open and calm

When a designer adjusts both layers with care, the kitchen feels clear from morning to night.
This balance also makes small kitchens feel larger because light spreads evenly across the space.

If you need help choosing fixtures that suit your BTO cooking routines, our
Guide to Kitchen Materials
also explains how surfaces reflect light and affect brightness.

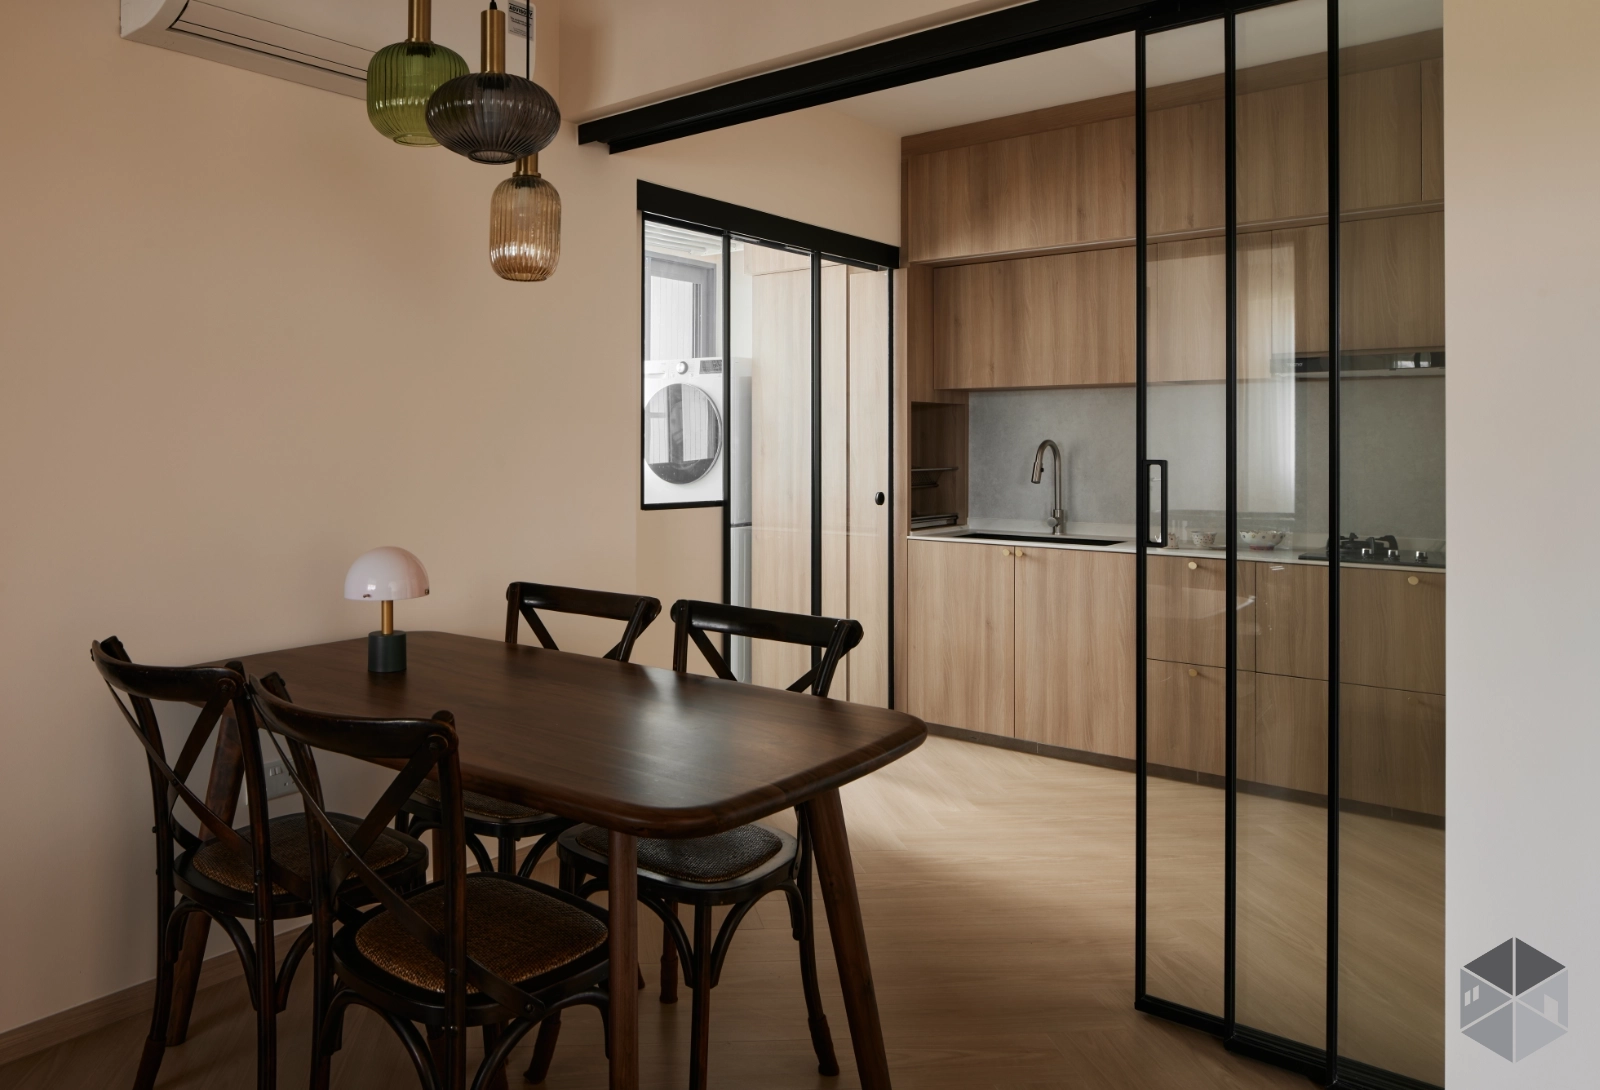
Lighting Design for Compact Kitchens

A compact BTO kitchen needs more than bright lights.
It needs lighting that supports your movement and improves visibility at every point.

Homeowners often think they need more lights when what they really need is better placement.
When you improve visibility in cooking areas, you reduce the number of fixtures needed.

A renovator upgrades kitchen ceiling lights with energy efficient fixtures that brighten the whole room.
Then, a contractor fits recessed lights along key paths so shadows do not fall across countertops.

Integrated under cabinet lights deliver clean and even brightness.
When an electrician replaces old fluorescent lights with LED strips, the kitchen feels brighter without glare.

In Singapore, this kind of layered lighting works well because many kitchens measure under 10 square meters.
Proper zoning becomes the key factor.
A designer highlights lighting zones by marking out corners, walkways, and the main worktop.

You can also adjust colour temperature to control mood.
Cool white works well when you need focus.
Warm white sets a calm tone for evenings.
A designer adjusts ambient lighting mood with dimmers so you can switch between these settings easily.

Here are some common lighting approaches that compact kitchens often use.
Each method helps create more clarity without crowding the room.

Popular Lighting Techniques for Compact Kitchens

  • Integrated LED strips under cabinets.
    This removes shadows on the worktop and gives even brightness where you prep food.
  • Recessed ceiling lights with adjustable brightness.
    These provide soft general lighting without taking up visual space.
  • Pendant lights over dining corners.
    A homeowner selects pendant lighting for dining corners to add contrast and warmth to the area.
  • Reflective backsplash materials.
    These help bounce light across the kitchen, making it feel more spacious.

If you prefer examples, our
BTO Kitchen Design Page
shows real homes where lighting zones help small kitchens feel open.

When you design lighting with a clear purpose, even a small kitchen works comfortably.
You get better clarity when cooking, smoother movement, and a kitchen that feels inviting every day.

Recommended Fixtures and Materials for Singapore Homes

When the renovator adds a layered lighting strategy to a BTO home, performance and reliability become important.
Singapore kitchens face moisture, heat, and daily use, so fixtures must handle long-term exposure.

LED lighting is the preferred choice for most BTO owners because it lasts long and uses little power.
It is also safe for compact kitchens since it releases low heat.

When a designer recommends LED lights for BTO kitchens, they often choose neutral white for clarity during food prep.
Some owners choose warm lighting for the dining corner because it brings a softer tone.

Durable materials matter too.
Fixtures made from aluminium or coated steel work well near wet areas.
Contractors often recommend these for long-term reliability.

A homeowner tests lighting colour rendering by looking at how the light shows real food colours.
Higher CRI values help you see ingredients clearly.
This small check improves your cooking experience.

Brightness levels also affect your workflow.
A user evaluates brightness levels for cooking by testing different bulb wattages before final installation.
This is a practical method that avoids too-dim or overly bright spots.

Singapore homes need fixtures that follow safety rules.
A homeowner checks lighting regulations in Singapore before buying any fixture meant for wet zones.
This avoids costly replacements during inspection.

When the right fixtures and materials come together, your kitchen becomes comfortable, safe, and easy to use.
You enjoy food preparation with better clarity and less strain.

Better planning gives you a kitchen that feels bright at every hour of the day.
The next part of this guide brings all the layers together so you can apply them with confidence when you plan your lighting upgrades.

How to Combine Lighting Layers for Everyday Use

Many BTO owners feel unsure about how many lights they need.
Some worry they might buy too many fixtures while others fear that the kitchen will end up dim again after renovation.

This is where a simple layering method helps.
You stack task lighting, ambient lighting, and accent lighting in a way that feels natural.

Start with your core cooking zone.
The area where you chop, wash, and prepare food must always be bright enough.
A homeowner optimizes lighting for food prep by testing the brightness directly over the worktop.
This step prevents shadows from blocking your view once cabinets are installed.

Next, set a baseline for the whole kitchen with ambient light.
Contractor installs ambient lights in a grid pattern so brightness spreads evenly.
This layer keeps the space comfortable when you are not cooking.

Accent lighting adds small touches.
Pendant lights over a dining nook or a small island help shape mood and draw visual focus.
A designer balances task and ambient lights by studying where shadows fall and adjusting bulb angles before final installation.

When a renovator explains how these layers work in a compact BTO kitchen, owners often realise that the goal is not more fixtures.
The goal is the right light at the right place.

Some homeowners also ask how many lumens they need.
Here is a simple guide you can use while planning with your designer or contractor.

  • Task lighting: about 500 lux for chopping and cooking.
    This brightness gives you clear visibility when handling knives or doing fine prep work.
  • Ambient lighting: around 150 to 300 lux.
    This range keeps the kitchen comfortable without tiring your eyes.
  • Accent lighting: moderate brightness levels.
    This is mostly about mood and visual tone rather than strong functional light.

If you need help applying these layers to your floor plan, our
BTO Kitchen Design guide
shows how real kitchens in Singapore use layered lighting in tight spaces.

When you design your lighting with clear steps, you avoid guesswork and enjoy a kitchen that supports daily routines smoothly.

Common Mistakes in BTO Kitchen Lighting

Many owners only realise lighting issues after they move in.
You can avoid this by learning the most common mistakes contractors and designers often see in new BTO units.

Mistake one involves installing one central ceiling light for the whole kitchen.
This leaves shadows on the sink, stove, and countertop.
It also makes the kitchen feel flat and small.

Mistake two happens when task lights are added too late.
If under cabinet lights are installed after carpentry is completed, wiring may be exposed or awkward to hide.
Electrician fits under cabinet task lights best when the carpenter and lighting designer coordinate early.

Mistake three involves colour temperature.
Some owners choose cool white for the whole kitchen, then realise it feels cold during dinner or early mornings.
Others choose warm white everywhere, then struggle to see food colours clearly.
User chooses warm or cool lighting temperature carefully based on how they cook and how long they spend in the kitchen.

Mistake four is choosing cheap fixtures that corrode in Singapore’s humid environment.
Stainless steel or coated aluminium is safer for long term use.

Mistake five is ignoring CRI, which affects how real colours appear.
Homeowner tests lighting colour rendering before confirming the final purchase to avoid dull or inaccurate colours when cooking.

By avoiding these mistakes, you build a kitchen lighting plan that lasts for years with minimal adjustments.

How Lighting Impacts Mood and Daily Function

Lighting plays a strong role in how you feel in the kitchen.
This is important in Singapore homes where the kitchen sometimes serves as both work zone and gathering place.

Bright task lighting helps you focus during meal prep.
It reduces accidents and improves clarity when working with wet or sharp items.
Homeowner evaluates brightness levels for cooking by standing at the countertop and checking for shadows.

Ambient lighting sets the tone for family meals.
When you dim the lights or use warmer tones, the room feels calm and comfortable.
Designer adjusts ambient lighting mood by placing switches where you can reach them easily without crossing the entire room.

Lights also shape the perceived size of the kitchen.
In compact BTO homes, evenly spaced lights can make the room feel wider.
This helps you move around with more ease even when the walkway is narrow.

These mood adjustments sound small but they add comfort during everyday use.
Cooking feels smoother, cleaning becomes less tiring, and the kitchen becomes a place you can use for longer periods without discomfort.

Lighting Recommendations Based on BTO Layout Types

Different BTO units have different kitchen shapes.
Here are recommendations based on common layouts in Singapore.
These are simple guidelines that owners can refer to before meeting a contractor.

1. Long galley kitchen

Use a row of recessed ceiling lights along the walkway.
Place under cabinet lights along the entire worktop.
Install one pendant light only if there is a dining corner attached.
This layout works well for 4 room BTO units where kitchens are narrower.

2. L shaped kitchen

Light both legs of the L with matching brightness.
Avoid leaving one side dark because the corner will feel cramped.
A homeowner plans BTO kitchen lighting layers by placing two task strips across both sides to keep brightness even.

3. Open concept kitchen

Use warm ambient lighting to mark the transition into the living area.
A designer recommends LED lights that stay consistent with the living room tone.
Pendant lights over the island work well for soft accents.

4. Closed kitchen with service yard

Install brighter task lighting at the worktop because the yard side often brings shadows.
Contractor installs ambient lights closer to the main door of the kitchen where the ceiling height is stable.

Each layout responds differently to light but the principles stay the same.
You control mood with ambient light and you ensure safety with task light.

Cost Considerations for Kitchen Lighting Upgrades

Many BTO owners want to know how much lighting upgrades cost.
Costs vary depending on fixture types, LED quality, and wiring needs.
Here is a clear breakdown that matches typical Singapore renovation projects.

  • Recessed downlights range from 25 to 80 dollars per piece.
    Contractor fits recessed lights depending on how many zones you have.
  • Under cabinet task strips range from 40 to 120 dollars per meter.
    Cost depends on voltage type and aluminium housing.
  • Pendant lights range from 60 to 200 dollars per piece.
    A homeowner selects pendant lighting for dining corners based on style and weight.
  • LED panels cost between 50 and 120 dollars per piece.
    These give wide and even brightness.
  • Dimmers cost 30 to 80 dollars each.
    Designer balances task and ambient lights with dimmers for flexible control.

Labour charges depend on wiring routes and ceiling type.
False ceilings may cost more but give cleaner lighting placement.

If you want better long term performance, choose higher quality LEDs.
They last longer and use less energy, which lowers your monthly bills.
User chooses energy efficient kitchen lighting to reduce heat buildup and power use.

Bringing It All Together

When you see your kitchen every day, good lighting makes all tasks easier.
It guides your movement, supports safe cooking, and helps maintain a comfortable mood.

Whether you are upgrading a new BTO or replacing older fixtures, the process follows the same steps.
You identify your lighting zones, you choose the right fixtures, and you let your contractor install them with careful placement.

A homeowner replaces old kitchen worktop lighting or old fluorescent tubes when the fixtures start flickering or losing brightness.
These small updates help maintain clarity during food prep.

Designers, contractors, and electricians all play different roles.
Lighting designer installs task lighting with focus on clarity.
Contractor installs ambient lights to build the base layer.
Electrician replaces old fluorescent lights and fits energy efficient LEDs for daily use.

When these roles align, you get a kitchen that feels clear, warm, and easy to use.
And this makes every meal, from busy weekday cooking to slow Sunday mornings, feel better.

  • Upload floor plan (if any)
  •  

Accreditation

BTO Kitchen Design
Guide to Kitchen Materials
Book a Consultation

Quartz vs Compact Laminate: The Truth About Kitchen Surfaces Every BTO Owner Should Know

Most BTO owners walk into their first renovation with mixed feelings.

You feel excited about the new home that you waited years for.

Then the stress comes in once you start choosing kitchen materials.
The choices look simple at first, but the moment you look deeper, you see many questions that never came up before.
You start wondering about heat resistance, moisture issues, kitchen traffic, stains from daily cooking, and long term durability.
This is where your search often narrows to quartz and compact laminate.

If you are like many new homeowners, you want a surface that will stay strong for years.
You want a clean look and easy care because you know the kitchen will take daily use.
You also want to avoid mistakes that cost more later.
It is normal to feel unsure, and most BTO owners feel the same when they choose their first countertop.

You may already have spoken with a designer who compares quartz and compact laminate with you.
You may also have a contractor ready to install the BTO kitchen countertop once you decide.
But you still want clear guidance because the choice affects daily life in a small BTO kitchen.
You want the right material because cooking habits in Singapore can be intense, and moisture has its own challenges.

You are the hero in this story because you are the one who will live with the result.
My job is to guide you and give you details that matter in real homes, especially for Singapore.
I have seen how quartz works for families with heavy cooking.
I have also seen how compact laminate helps owners who want a clean look at a lower price.
With the right explanation, you will see what fits your home and your habits.

The promise is simple.
By the time you reach the end of this, you will feel clear and steady when choosing your worktop.
You will know what your BTO kitchen needs for your cooking style, budget, and long term care.
You will also understand where quartz shines and where compact laminate fits better.
Your choice will be informed and practical.

Design a Home That Hugs You Back

More than walls and furniture — it’s where your kids grow up, where laughter echoes. Let’s plan a space that feels like home. Talk to our designers today.

Elpis interior Design polaroid

Our Partners

Why Materials Matter in BTO Kitchens in Singapore

If you moved from your parents’ home to your new BTO, the kitchen may feel smaller than what you grew up with.
That is common.
Most BTO kitchens sit between 2.3 to 3 meters in width.
Every inch matters, so your countertop becomes the main work zone.

This is why the material matters.
A BTO homeowner chooses kitchen materials based on how the family cooks.
Some cook daily with high heat, while others cook only on weekends.
Some prefer light meals, while others handle heavy wok cooking.
Your countertop needs to match the tasks you do most often.

Singapore has high humidity all year.
Moisture sits on surfaces and spreads through corners fast.
If the material handles moisture poorly, swelling or peeling can show in less than two years.
This is why homeowners check moisture resistance when they choose kitchen surfaces.
The safer materials tend to be quartz and compact laminate because they resist moisture better than many older surface types.

Heat is another factor.
A renovator explains the pros and cons of quartz to many BTO owners who cook with strong heat daily.
Quartz handles heat well, though you should still avoid placing a pot straight from the stove onto the surface.
A renovator explains the pros and cons of compact laminate to owners who need something more affordable.
Compact laminate has good heat tolerance, but you cannot place hot pans on it.
You need a trivet when handling high heat.

Scratches matter too.
A designer suggests scratch resistant surfaces because chopping happens fast in a small kitchen.
If you get busy during meal prep, you may place knives down without thinking.
Quartz is harder and stays smooth longer.
Compact laminate holds up well, but it can mark if you chop directly without a board.

Then there is Singapore cooking.
Soy sauce.
Oil.
Chili.
Laksa paste.
Turmeric.
A homeowner selects stain resistant materials because these foods stain easily.
Quartz works well for stains because it is non porous.
Compact laminate holds up, but stains can stick if left overnight.

This is why BTO owners need strong guidance.
A buyer compares laminate vs solid surfaces during early planning.
A user researches affordable BTO kitchen countertop options because some quotes can jump out of budget fast.
You may find that quartz fits your long term needs better, but you may also find that compact laminate saves money for other parts of the home.
Both choices can work if the plan matches your daily life.

Think about the years ahead.
A contractor replaces an old kitchen worktop when it swells or cracks.
If you plan the kitchen well now, you avoid that cost later.
A buyer reviews the lifespan of quartz because most quartz tops last ten to fifteen years.
A buyer reviews the lifespan of compact laminate because it can last seven to ten years with normal use.
Your cooking habits decide which one lasts longer in your home.

Your kitchen sees more activity than most rooms in a BTO.
This is why you want a material that handles daily life without stress.
When you understand how quartz and compact laminate respond to heat, moisture, and scratches, you can choose with confidence.
You will also feel calmer when your contractor measures countertop thickness or when your designer explains why one surface suits your layout better.

The promise here is that you will understand your choices clearly.
You will not feel lost when comparing quartz with compact laminate.
You will know what fits your budget, what fits your cooking style, and what fits your home in Singapore’s climate.
This clarity will guide you through the rest of the renovation.

Kitchen Surface Material Comparison: Quartz, Compact Laminate, and More

You may already have a general idea of what quartz and compact laminate offer.
But to choose with confidence, you need to see how each material performs in real kitchens.
This part explains the strengths and limits in everyday use.
It also shows how each one behaves under moisture, heat, and stains.

Most BTO owners start this process by looking at how the designer compares quartz and compact laminate based on lifestyle and cooking patterns.
Then the contractor installs the BTO kitchen countertop once you confirm the material.
The best choice is the one that works for your habits.

Before we go deeper into the numbers and examples, here are the main materials used in Singapore today.
Each one offers different levels of durability, care, and cost.

Material Durability Moisture and Heat Resistance Maintenance Cost Range (SGD per sq ft) Aesthetic Style
Quartz Very high Strong moisture resistance, strong heat tolerance Low care needed 180 to 320 Clean and uniform look
Compact Laminate High Good moisture resistance, moderate heat tolerance Moderate care needed 60 to 120 Modern with many designs
Sintered Stone Very high Strong stain and heat resistance Low care needed 200 to 350 Premium finish
Solid Surface Medium Good moisture resistance, low heat tolerance Moderate care needed 150 to 250 Curved shapes possible
Granite High Strong heat resistance, needs sealing for moisture High care needed 130 to 300 Natural patterns

These numbers show the key differences.
Quartz stands at the top for ease of care.
Compact laminate gives good performance at a lower cost.
Sintered stone is the most durable, but the price is high.
Solid surface and granite suit specific needs but may need more maintenance.

Performance and Singapore Specific Factors

You now have a clear view of how each material sits in terms of cost and durability.
The next part is seeing how quartz and compact laminate behave under Singapore conditions.
Many BTO owners start with a simple question, which material stays stable in daily life.
When you understand this part, your choice becomes easier.

Humidity affects every kitchen here.
Moisture sits in corners after cooking, and steam builds up fast in compact spaces.
A homeowner checks moisture resistance in kitchen surfaces because swelling can appear when the wrong material is installed.
Quartz is non porous, so moisture does not enter the surface.
Compact laminate blocks moisture well, but long term performance depends on the quality of sealing at the edges.

Heat is the next factor.
A renovation team tests heat resistance of countertops when they help owners compare options.
Quartz holds heat better.
You can place warm pots on quartz without trouble, though direct high heat from a pan straight off the stove is still risky.
Compact laminate manages warm pots but cannot handle very hot pans.
You should use a trivet to avoid surface marks.

Scratches matter because BTO kitchens are small.
Cutting boards move around.
Knives get placed down quickly when you cook.
A user evaluates countertop durability during the design stage.
Quartz has a dense surface.
Chopping on it without a board might leave marks on the knife instead of the counter.
Compact laminate manages daily prep well, but the surface can show shallow marks from sharp tools.

Stains come from daily recipes.
Singapore cooking uses soy sauce, turmeric, oyster sauce, garlic, sambal, and curry mixes.
A homeowner selects stain resistant materials to avoid dark patches and yellow marks that are hard to remove.
Quartz resists these stains.
Compact laminate handles most spills but needs fast wiping when turmeric or sambal hits the surface.

Traffic patterns also matter.
Many families place groceries on the counter.
Some use the worktop to sort school items or fold clothes.
Quartz suits this kind of multi use space because the surface does not wear easily.
Compact laminate works too, as long as you avoid dragging heavy objects across the top.

Each of these points helps you see how the material fits your cooking style.
You may want quartz if you cook often, handle high heat meals, or need something that stays smooth for years.
You may want compact laminate if your cooking is light, your budget is tight, and you still want a clean look that performs well.
Both choices work when matched with the right habits.

The promise is that once you understand heat, moisture, scratches, and stains, you can choose the surface that supports your life.
Your kitchen becomes easier to use when the material fits your routine.

Cost vs Durability vs Maintenance: Finding Your Ideal Balance

Every BTO owner thinks about cost during renovation.
You may have a set budget before the first meeting.
You may also feel tempted to stretch it when you see a design you like.
This is where countertop decisions require clear thinking.
The material you choose affects your cost now and your long term cost later.

A user compares kitchen surface pricing in Singapore during the planning stage.
Quartz sits in the higher range.
Compact laminate stays within a lower range.
The difference is clear.
Quartz costs more but lasts longer.
Compact laminate saves money now but may need replacement earlier depending on use.

Durability matters.
A buyer reviews the lifespan of quartz during the early research stage.
Quartz can last ten to fifteen years with normal use.
Some homes keep the same quartz top for more than twenty years.
A buyer reviews the lifespan of compact laminate and finds that it lasts between seven to ten years.
You may get more years if you cook less or care for the surface well.

You also want to think about care.
A BTO owner checks maintenance requirements before choosing.
Quartz needs simple care.
You wipe it with mild soap and water.
You do not need polish or sealing.
Compact laminate also needs simple care, but you must avoid placing hot pans on it.
You also need to wipe spills quickly when handling strong colours.

Your cooking habits decide the balance.
If you cook heavy meals daily, quartz may be worth the cost.
If you cook light meals, compact laminate may suit you better.
If you want a long term surface that stays smooth, quartz matches your needs.
If you want something modern at a lower price, compact laminate fits well.

This part is about clarity.
Your countertop is not only a design feature.
It is a tool you use every day.
When you choose the right tool, your kitchen becomes easier to manage.
You spend less time worrying about stains or scratches and more time enjoying your new home.

The promise is that you will be able to choose based on facts.
You will weigh cost, durability, and care without stress.
Once this part becomes clear, your renovation becomes easier to plan.

Best Kitchen Materials for Singapore Conditions

By now, you know how quartz and compact laminate behave under real cooking and in humid spaces.
This section helps you see which one fits your lifestyle better.
The goal is simple.
You choose a surface that works for years without trouble.

Here are the main matches for Singapore kitchens.
Each one suits a different type of home and cooking style.
The list uses bullets for clear reading, but you will also see short explanations after each point to guide your choice.

  • QuartzQuartz is a strong choice for families who cook often.
    It works well for high humidity and stays stable under strong heat.
    It resists stains even from turmeric or sambal.
    If you want low effort care and long term use, quartz fits your needs.
  • Compact LaminateCompact laminate suits owners who want a modern look at a lower cost.
    It manages daily tasks well and handles moisture better than many older materials.
    It needs a bit more care with heat, but it is affordable and easy to maintain.
    If you need a good surface without stretching your budget, compact laminate helps you save.
  • Sintered StoneSintered stone handles heavy cooking, high heat, and moisture without trouble.
    It is stable, hard, and long lasting.
    The cost is higher, but you get strong performance.
    This surface suits owners who want a premium finish and a long life span.

Other materials like granite and solid surface have strengths but need more care.
Granite needs sealing to prevent moisture marks.
Solid surface is good for curved shapes but cannot handle strong heat.
Each one suits specific uses, but quartz and compact laminate work best for most BTO homes.

Your choice depends on your routine.
If your cooking involves strong flavours or heavy heat, quartz gives you stability.
If your cooking is light and budget is your priority, compact laminate gives you value.
If you need something ultra strong, sintered stone gives you long term performance.

The promise of this section is that you now know what suits your kitchen.
Your decision becomes clear when you match your daily habits with the material.
This clarity helps you avoid mistakes that cost more later.

Conclusion

You now understand the real differences between quartz and compact laminate.
You have seen how they respond to heat, moisture, and daily use.
You know what each one costs, how long each one lasts, and how each one fits a BTO kitchen.
This knowledge helps you choose without stress.

As you plan your renovation, choose the surface that fits your life.
If you cook often and want a surface that stays clean with little care, quartz helps you.
If you want a good surface at a lower price, compact laminate gives you value.
Both choices work when matched with the right habits.

You can also view more ideas in our guide on
BTO kitchen layout planning
for extra planning help.
If you want more detail on other materials, you can read this external guide on
countertop selection.

taruh di bawah artikel:

  • Upload floor plan (if any)
  •  

Accreditation


Tiny BTO Kitchen? These Hidden Cabinet Ideas Will Change How You Cook Forever

You open your BTO kitchen and see limited cabinet space that does not match your needs.
You want clear, practical cabinet solutions that fit Singapore flats and daily routines.

Many homeowners in Singapore feel the same way when they face small kitchen cabinet designs.
This guide focuses on BTO kitchen cabinet ideas that bring usable storage into compact layouts.

The aim is to give you space-saving kitchen cabinets that work every day.
You will read real options, costs to expect, and clear steps to plan carpentry work.

If you want an overview of kitchen layout choices that link with cabinet planning, visit our internal guide on
BTO kitchen layout ideas.
That page helps you pair cabinet style with the best layout for your flat type.

Design a Home That Hugs You Back

More than walls and furniture — it’s where your kids grow up, where laughter echoes. Let’s plan a space that feels like home. Talk to our designers today.

Elpis interior Design polaroid

Our Partners

Storage Challenges in BTO Kitchens

You stand in the kitchen and feel the limits of low cabinet depth and short overhead space.
You lose time searching for pans and lids that vanish at the back of deep cupboards.

Many BTO kitchens in Singapore have tight floor plans and limited wall length.
This reduces the area available for modular kitchen cabinets Singapore suppliers usually install.

Standard cabinets often leave dead zones in corners and gaps beside appliances.
These unused pockets make you feel that the layout wastes valuable centimetres.

Overhead cabinet BTO design is often shallow or too high to reach without a step.
This forces you to store daily items in low drawers that clutter the countertop.

Some homeowners try to crowd more units into the kitchen and then find the space feels cramped.
Poorly planned cabinets can block natural ventilation and reduce your usable workspace.

You also face humidity and heat that affect materials in Singapore’s climate.
The wrong cabinet material warps faster and increases maintenance work.

Another common issue is appliance fit.
The fridge, oven, and hood often leave millimetre gaps that designers can use for pull-out cabinet mechanisms.

You need solutions that increase access and reduce clutter within the same footprint.
This is where concealed kitchen storage and smart carpentry ideas matter most.

Hero: Why Hidden Cabinet Ideas Matter

You want a kitchen that supports daily cooking and storage without crowding your small flat.
You fear that a wrong carpentry decision will cost money and time.

This section guides you through identified problems and fixes used by trades in Singapore.
The goal is to give you clear options before you sign a carpentry contract.

You will learn which space-saving kitchen cabinets suit common BTO layouts.
You will also learn how soft-close cabinet systems and pull-out solutions change access.

After reading this section, you will have a short list of practical cabinet ideas to test in your flat.
You can then ask your carpenter for exact dimensions and cost estimates.

Guide: Common Hidden Cabinet Strategies

Pull-out cabinet mechanisms convert narrow gaps into pantry space.
A pull-out pantry beside the fridge stores spices and bottled sauces in vertical rows.

Slim pull-outs reduce the need for deep cupboards that hide items at the back.
You gain quick access and clear sight lines for small items.

Deep drawers with cutlery and pan dividers replace low shelves that waste space.
A top shallow drawer for utensils keeps the counter tidy and the prep area clear.

Overhead cabinet BTO design should include accessible lower shelving.
Use stepped shelving so you do not need to reach to the very back.

Corner carousels and magic corners open a tight L shape layout.
These solutions turn blind corners into organised storage for pots and pans.

Concealed kitchen storage hides appliances behind cabinet doors for a cleaner look.
You can hide your microwave or coffee machine in a lift-up cabinet that tucks away when unused.

Space-saving kitchen cabinets can include fold-down tables or retractable counters.
These give you extra work surface when needed without permanent space loss.

Vertical pegboards inside cabinet doors hold lids and small tools.
This keeps lids upright and frees drawer space for heavier items.

Guide: Material Choices and Durability

You must choose materials that resist moisture and heat in Singapore.
Marine plywood and treated MDF with water-resistant finishes perform well in humid kitchens.

Laminate remains cost effective for visible cabinet faces and is easy to clean.
Solid wood faces need more care in tropical climates and may cost more.

Hardware quality affects long term use.
Soft-close cabinet systems reduce noise and stress on hinges, which extends cabinet life.

Drawer runners and pull-out slides should support heavy loads.
Choose rated soft-close runners with at least fifty kilogram capacity for base drawers.

Gasket seals on cabinet doors reduce dust and grease buildup.
These seals also help maintain interior cabinet conditions during heavy cooking.

Local suppliers for modular kitchen cabinets Singapore offer faster lead times and easier warranty support.
Sourcing locally also reduces delivery adjustments that often add to cost.

Promise: What These Ideas Deliver

These hidden cabinet ideas make your BTO kitchen easier to use and cleaner to maintain.
You will reduce the time you spend searching for items and increase usable counter area.

You will also gain clearer options to discuss with carpenters and suppliers.
This helps you get accurate quotes for BTO kitchen carpentry ideas that match your budget.

In the next part, you will read specific cabinet layouts and cost examples.
You will also see case examples from Singapore flats to help you decide which solutions fit your home.

Hidden Cabinet Strategies That Change Small BTO Kitchens

You may feel that your kitchen has reached its limit.
You look at the floor plan and believe there is no more room to work with.

Many Singapore homeowners share this feeling, especially in 2 room or 3 room BTO units.
The cabinets feel fixed and the layout feels rigid.

This section guides you through cabinet strategies used in small flats across Singapore.
These options help you gain more storage without expanding your footprint.

When you review these ideas, picture your daily routine.
This will help you decide which solutions support your cooking habits.

1. Pull Out Cabinets and Drawers

Deep cupboards are hard to reach and reduce access to stored items.
A full pull out drawer converts this depth into clear storage rows.

Pull out trays and baskets slide out fully on runners.
This prevents clutter from building up in hidden corners.

You can design narrow pull outs of ten to fifteen centimetres beside the fridge.
These hold cooking oils and sauces in upright positions.

Many homeowners in Singapore choose pull out spice trays beside the hob.
This keeps items within reach during cooking and lowers prep time.

Pull out drawers also support heavier cookware.
You can request sturdy runners with higher weight ratings for pots and pans.

2. Vertical Storage Use

Small kitchens lose storage because the vertical space above the counter is empty.
Tall overhead cabinets change this by using full wall height.

You can add adjustable shelving in overhead units.
This lets you change shelf height when you buy new appliances or containers.

Vertical dividers help store trays, chopping boards, and baking sheets upright.
This gives you quick access and prevents them from falling sideways.

Some homeowners add a slim vertical cabinet beside the oven tower.
This creates a hidden slot for baking trays.

Tall cabinets also reduce counter clutter.
You can keep less used appliances in the upper zones.

3. Integrated Appliances and Concealed Cabinets

Concealed kitchen storage and appliance integration create clear lines and reduce clutter.
You can hide your microwave inside a lift up cabinet to keep it off the counter.

Ovens, dishwashers, and compact washers can fit into cabinet modules.
This creates a blended look that feels more organised.

Concealed vertical drop zones work for items like mini rice cookers or kettles.
These zones hide cables and keep the counter clear.

Soft close cabinet systems reduce noise during daily use.
These hinges and runners also last longer and require less maintenance.

Many Singapore homes now include appliance garages.
These hide small appliances behind a sliding door that tucks into the cabinet.

4. Corner Systems That Increase Access

Corner areas often stay unused because you cannot reach the back.
Magic corner systems bring items forward when you open the door.

A carousel is another option for tight corners.
It rotates and lets you access pots stored in the back.

These systems cost more than standard shelves.
They reduce wasted space and help you store heavier cooking tools.

L shape kitchens benefit most from upgraded corner systems.
You gain storage without changing the layout.

5. Overhead Cabinet BTO Design

Overhead cabinets increase storage when floor area is limited.
The height allows you to fit larger items and reduce countertop mess.

Add stepped shelves inside overhead units to improve reach.
This helps shorter users reach items stored deeper inside.

Some homeowners request two tier overhead cabinets.
The upper tier stores less used items while the lower tier holds daily tools.

Frosted glass doors make the kitchen feel less heavy.
They also let you see stored items without exposing them fully.

6. Smart Add Ons for Better Organisation

Pegboards inside cabinet doors hold lids and tools.
This clears space inside drawers for other items.

Drawer organisers keep utensils and tools separated.
This prevents items from mixing and saves time during cooking.

Hidden bins inside lower cabinets reduce visual clutter.
Use a pull out bin with two or three compartments for waste sorting.

Under cabinet rail systems hold cups and utensils.
These rails also leave the counter free for food prep.

Magnetic strips inside door panels hold knives securely.
This removes the need for a block on the counter.

Material and Finish Tips for Durable and Stylish Cabinets

You want long lasting materials that resist humidity in Singapore.
This section explains common choices used in BTO kitchen carpentry.

Laminate remains popular for its wide selection and cost range.
It is easy to clean and works well for visible cabinet faces.

Marine plywood performs well in wet zones near the sink.
It resists warping and stays stable in humid conditions.

MDF with water resistant coating is suitable for overhead cabinets.
It offers a smooth surface for painted and laminated finishes.

Hardware quality decides how long cabinets will last.
Choose branded soft close systems for hinges and drawer slides.

Consider matte finishes if you want to reduce fingerprints.
Glossy finishes reflect light and make small kitchens feel larger.

Many carpenters in Singapore can mix materials.
This lets you pair marine plywood at the base with MDF above to balance cost.

Material Durability Care Cost Range SGD Finish Options
Laminate Moderate Low $$ Matte, Glossy
MDF Water Resistant High Moderate $$$ Painted, Veneer
Marine Plywood High Moderate $$$ to $$$$ Painted, Veneer

If you want to compare materials used in full carpentry builds across Singapore,
you can view our guide on
BTO kitchen materials
for more examples.

Case Examples of Small BTO Kitchens Improved with Hidden Storage

You may wonder how these ideas work in real homes.
These case examples show results from BTO kitchens across Singapore.

A homeowner in Jurong West had a narrow galley layout.
The kitchen lacked storage and had clutter on the counter.

The carpenter installed tall overhead cabinets and added pull out trays.
The homeowner gained about thirty percent more usable storage space.

A couple in Tampines had a compact L shape kitchen.
They struggled with a blind corner that wasted space.

A magic corner system fixed the access problem.
The couple now uses the corner to store pots and heavier tools.

A small 2 room flat in Toa Payoh used concealed storage for appliances.
A sliding appliance garage now hides the coffee machine and toaster.

These small changes improved daily cooking and reduced clutter.
They also made each kitchen easier to clean and maintain.

You can view more layout case studies in our cabinet guide at
BTO kitchen cabinet design examples.
These pages include layouts for different flat types.

Working With Elpis Interior for Cabinet Planning

You may feel unsure about material choices or layout planning.
Working with an experienced designer helps you avoid common errors.

You can review 3D views of your kitchen before confirming carpentry.
This shows you how cabinets will look and helps you adjust measurements.

Elpis Interior plans cabinets around your daily flow.
This includes cooking, cleaning, storage habits, and appliance needs.

You get a clear cost breakdown for carpentry, hardware, and materials.
This helps you stay within budget without losing function.

To begin planning your kitchen with an experienced team,
you can submit your floor plan through our enquiry page at
Elpis Interior Enquiry.
This helps you get started with proper measurements.

Practical Steps You Can Take Before Finalising Your Cabinet Layout

Many homeowners feel unsure when they reach the planning stage.
They may have ideas saved, yet the layout still feels unclear.

This section guides you through simple steps that help you prepare.
These steps reduce errors and help your renovation progress smoothly.

Start by listing the items you use daily.
This helps you plan storage zones that match your routine.

Cooking tools should stay near the hob area.
Baking tools should stay near the oven or prep counter.

Many Singapore kitchens use a three zone workflow.
These zones include cleaning, cooking, and preparation.

When you follow a zone system, your cabinets work harder for you.
You reduce walking distance and save time during prep.

Measure all appliances before finalising cabinet carpentry.
This prevents size mismatch issues during installation.

Pay attention to sink depth and base cabinet height.
These measurements influence comfort during cleaning.

Check power points in your kitchen.
This ensures that concealed appliance zones stay functional.

Review ventilation paths for your hood.
This prevents smoke from lingering in small BTO units.

Once you complete these steps, you gain clarity.
You also begin to see how each cabinet supports daily use.

Choosing the Right Cabinet Layout for Your BTO Unit Type

Each BTO flat type comes with different spatial limits.
Cabinet layout choices should match the shape of your kitchen.

In a 2 room unit with a narrow entry, linear storage works well.
It keeps the walkway clear and prevents congestion.

A 3 room BTO kitchen benefits from pull out storage and overhead units.
These features add capacity without reducing free space.

For 4 room BTO kitchens with an L shape, corner systems matter.
They prevent wasted areas and improve access.

In a 5 room flat, you may have more layout flexibility.
Designers can include tall pantry cabinets or appliance towers.

Some homeowners in Singapore choose glass fronts for upper cabinets.
This reduces the visual weight and brightens the space.

You can use the following table to compare layout needs.
This helps you decide which cabinet features suit your flat type.

BTO Type Layout Fit Cabinet Focus Common Storage Issues
2 Room Linear Slim pull outs and narrow drawers Limited base storage
3 Room Galley or Linear Overhead cabinets and slide out trays Counter clutter
4 Room L Shape Corner systems and tall cabinets Blind corner space
5 Room L Shape or Open Plan Pantry towers and integrated appliances Large base cabinets without dividers

These comparisons serve as a starting point.
The exact plan should reflect your cooking habits and lifestyle needs.

You can explore more layout variations at
BTO kitchen layout ideas.
This page includes examples for different shapes and sizes.

How Good Cabinet Planning Improves Daily Cooking

A well planned cabinet layout changes how you move in your kitchen.
You begin to notice that cooking becomes smoother and faster.

When your spices stay near the hob, you reach less.
When your chopping boards stay upright, you retrieve them faster.

Pull out systems bring stored items toward you.
You no longer bend deep into dark cupboards.

Soft close hinges reduce noise.
This creates a calmer space when several family members cook together.

Overhead cabinets reduce clutter on the counter.
This leaves more space for meal preparation.

Concealed storage zones hide small appliances.
This produces a cleaner look that many Singapore homes prefer.

Daily tasks become easier when each item has a clear home.
You reduce time spent searching for tools and ingredients.

You may also notice that cleaning becomes simpler.
A clear counter means faster wipe down after dinner.

Cost Considerations for BTO Kitchen Cabinet Projects

Cabinet work forms a large part of your kitchen renovation cost.
It helps to understand the key cost drivers before you commit.

Material selection influences cost.
Marine plywood costs more than laminate covered MDF.

Hardware with better durability also increases cost.
Soft close hinges and heavy duty runners belong to the mid to high range.

Integrated appliance zones cost more than simple cabinets.
They require precise measurements during carpentry.

Pull out systems add convenience.
They raise project cost due to extra hardware.

You can use this table for rough reference.
Prices may vary based on carpentry size and project scope.

Cabinet Feature Typical Range SGD Notes
Base Cabinets per foot run 110 to 180 Prices vary by material
Overhead Cabinets per foot run 90 to 150 Height changes cost
Pull out systems 120 to 450 Brand influences price
Magic corner unit 350 to 900 Higher cost for premium runners
Integrated appliance cabinet 180 to 450 Depends on appliance size

Many homeowners choose a mixed approach.
This balances function with budget.

You can review cabinet cost guides at
Elpis Interior Singapore.
These pages help you plan your renovation budget.

How to Prepare for Installation Day

Renovation day brings activity and noise.
Preparing early helps your project run smoothly.

Clear your kitchen fully before carpenters arrive.
This reduces delays during installation.

Confirm your power points and water lines in advance.
This prevents adjustments after carpentry begins.

Keep fragile items away from the work area.
Some dust forms during drilling and cutting.

Review the layout with the project manager one day before work.
This ensures alignment between your plan and final build.

Check the cabinet level and door alignment after installation.
This helps the team adjust hinges before leaving.

Keep your warranty documents.
Hardware and carpentry usually include separate coverage periods.

Your Next Step Toward a More Efficient BTO Kitchen

You now see how cabinet design affects your daily life.
Even small kitchens in Singapore can gain more function with the right plan.

If you want a kitchen that fits your lifestyle and supports your routine,
you can reach the Elpis Interior team for guidance.

You may share your floor plan through the enquiry page.
The team will study your layout and prepare recommendations.

You will receive cabinet plans, material suggestions, and workflow advice.
This helps you see how each decision improves your space.

You can start your planning today at
Elpis Interior Enquiry.
This step helps you gain clarity and confidence in your renovation.

  • Upload floor plan (if any)
  •  

Accreditation

Don’t Design Your BTO Kitchen Yet — See These 7 Layout Tricks Singapore Designers Swear By

Many homeowners in Singapore stand inside their new flat and look at the small BTO kitchen layout with a mix of hope and worry. You want a space that works for daily cooking, but the compact layout makes you feel unsure about what to plan first.

You may even imagine how your family will cook and prepare meals in that space, yet the limited area in most BTO units can make those ideas feel out of reach. It is normal to feel uncertain at this stage because kitchen planning involves many decisions and each one affects your daily life in a real way.

At Elpis Interior, we handle many BTO interior design kitchen projects across Singapore and we see these same concerns often. You want a kitchen that fits your routines, fits your family, and fits the scale of a typical HDB unit.

We guide you through small BTO kitchen layout planning with a method that stays clear and practical. You learn how the structure of the kitchen affects your cooking routines. You also see how simple layout choices can reduce clutter and create a smoother workflow.

This article covers seven practical layout tricks that work well for BTO kitchens in Singapore. You will see how each layout supports movement, storage, and visual comfort. These ideas help you plan your space before you commit to any costly renovation decisions.

If you want to explore more design guides, you can also view our
BTO interior design Singapore overview for broader planning steps.

Design a Home That Hugs You Back

More than walls and furniture — it’s where your kids grow up, where laughter echoes. Let’s plan a space that feels like home. Talk to our designers today.

Elpis interior Design polaroid

Our Partners

Why Layout Is Key in BTO Kitchens

Many BTO owners in Singapore face the same issue. The kitchen space is small and the floor area ranges between three point five to six square metres in most standard units. You want to fit storage, appliances, and cooking zones into a narrow area that often gives little room to adjust.

You may worry that the space will feel tight once you place large appliances in it. You may also feel unsure about whether the sink, stove, and fridge positions will allow you to move comfortably when you cook.

These concerns are valid. A kitchen layout guides your movements in clear ways. Studies show that an organised kitchen layout can reduce cooking and cleaning time by up to thirty percent because each step follows a predictable path.

Many homeowners in Singapore want an open-concept BTO kitchen but feel unsure about the structural rules in HDB flats. Others worry about ventilation or noise when the kitchen connects to the living area. Each of these points links directly to layout planning.

When you plan the sink, stove, and fridge clearly, you create strong workflow zones. These zones reduce unnecessary steps. You cook faster. You maintain a cleaner environment. You feel more relaxed while using the space.

If you want to see how layout mistakes happen, you can visit our guide on
kitchen renovation mistakes in Singapore to understand what to avoid.

Many BTO units share similar structural boundaries, so these layout rules remain reliable across three room, four room, and five room flats. These rules apply whether you are working with a galley kitchen BTO design or a mixed open layout.

When you understand these limits, you feel more confident about planning your renovation. You also reduce the risk of costly revisions later in the process.

The 7 Designer-Approved Layout Tricks for Your BTO Kitchen

Many homeowners in Singapore feel stuck when planning a small BTO kitchen layout. You want a space that feels clear, so you can cook without feeling restricted. You also want storage that fits your routines and supports everyday work.

These seven layout tricks help you understand how Singapore designers plan kitchens in tight floor plans. You will see how each layout improves the workflow zones and reduces clutter. You will also learn how these ideas fit common HDB kitchen space planning rules.

1. Embrace the Linear Layout with Multifunctional Stations

Many three room BTO units use a linear kitchen because the walkway is narrow. You may worry that a single wall feels too tight, but this layout helps you move in a straight line with little obstruction. It also supports clear zoning since the entire workflow stays within reach.

Designers in Singapore use vertical storage systems in linear layouts. These systems keep counters clear and reduce movement. You can also add multifunctional pull out drawers to hold knives, cooking tools, and small appliances so your prep area stays organised.

2. Opt for an L Shape with Corner Solutions

Many four room BTO kitchens fit an L shape layout because it gives extra counter space. You may struggle with corner areas, but you can use rotating trays or pull out carousels. These systems help you reach items without bending or stretching.

Homeowners in Singapore like the clear separation between prep zones and washing zones in an L shape layout. This structure supports a smoother workflow since each task sits in a clear zone.

3. Island or Peninsula Counters for Larger BTO Units

Five room BTO units sometimes allow an island or peninsula. You may want more surface area for cooking or baking, so an island can support this work. It also serves as a dining area that connects to the living room.

You can use a peninsula if you want partial openness but still need structure. Many homeowners in Singapore choose this layout because it provides storage and a clear food prep zone.

4. Vertical Storage, Think Upwards

If your kitchen feels tight, vertical storage helps you gain more space without widening the room. You can install tall cabinets that reach near the ceiling. This gives you room for dry goods, tools, or infrequent items.

Singapore designers often hide appliances behind cabinet doors to keep the layout clean. This method supports a tidy look in small kitchens where clutter stands out.

5. Integrate Smart Appliance Placement to Maintain the Work Triangle

The sink, fridge, and stove must sit in positions that reduce movement. You want each part of the work triangle within a short reach so you save time during cooking.

Many homeowners in Singapore mount the oven at eye level so the lower cabinets stay free. This positions the oven at a safe height while improving storage access in a small BTO kitchen layout.

6. Sliding or Pocket Doors to Save Room

Many HDB units use hinged kitchen doors. These doors take up walkway space. You can use sliding or pocket doors to keep the walkway clear and support better airflow.

Sliding doors help you move freely when carrying groceries or preparing meals. They also keep the kitchen connected to the dining area when you need more room for gatherings.

7. Use Light Colours and Reflective Surfaces

Light colours create a sense of openness in small BTO kitchens in Singapore. Homeowners use white, pale grey, or beige to brighten the space. You can also use reflective cabinet fronts to improve the overall look.

These choices support a calm cooking space. You feel less cramped and more willing to spend time in the kitchen during busy weekdays.

These seven layout ideas give you clear ways to plan your kitchen before renovation. You understand how each layout affects movement, storage, and the daily cooking experience in your BTO flat.

Smart Layout Picks for Popular BTO Floor Plans

Many homeowners in Singapore choose their layout based on their specific BTO flat type. Each flat size offers unique limits. You must understand these limits before you commit to renovation work.

This section reviews layout options that match common BTO sizes. You will see how each structure supports storage, workflow, and family routines.

BTO Flat Type Recommended Kitchen Layout Key Features Average Size in Square Metres
3 Room Linear Layout with Multifunctional Storage Single wall counter plus vertical storage 3.5 to 4.5
4 Room L Shape with Corner Systems Clear prep zones plus rotating trays 4.5 to 5.5
5 Room and Larger Units Island or Peninsula with L Shape Extra cooking surface plus partial openness 5.5 to 7

These layout recommendations come from recurring patterns in HDB kitchen space planning across Singapore. You can use these as a guide, then adjust based on your cooking routines, appliance sizes, and family needs.

If you want detailed cabinet designs for each layout, you can visit our
BTO kitchen cabinet guide for Singapore homes.

Seamlessly Integrating Your Kitchen with Dining and Living Areas

Many homeowners worry that their BTO kitchen feels too separate from the rest of the home. You may stand in the kitchen during meal prep and feel disconnected from your family or guests. You may also feel uncertain about how to link finishes across the kitchen, dining area, and living room.

Designers in Singapore guide homeowners through this planning stage by making clear visual links across connected spaces. You can match cabinet colours with the TV console or match dining table tones with the kitchen worktop. These small choices make the spaces feel related without major renovation work.

Many homeowners also use a peninsula or raised counter as a casual dining point. This setup supports fast meals, quick snacks, and small gatherings. It also lets you talk to your family while preparing food.

You can place open shelves or glass front cabinets near the dining zone to hold plates and glasses. This reduces back and forth movement and keeps daily routines simple. You can also use task lighting to show clear boundaries between cooking, serving, and dining zones.

If you want more ideas on storage systems that fit this type of layout, you can view our guide on
BTO kitchen cabinet planning in Singapore. You will see how cabinet depth, shelf spacing, and placement affect your daily routine.

When you link your kitchen with your living and dining areas in a clear and natural way, the home feels easier to use. You move across the zones without stress, and this helps you enjoy the time spent preparing meals.

How Elpis Interior Helps with BTO Kitchen Layout Customisation

Many homeowners feel unsure about the right kitchen plan for their BTO flat. You may worry that your space is too small or too narrow. You may also feel stressed about picking materials, colours, and storage systems that match your daily habits.

At Elpis Interior, we guide you through each decision in a clear and structured way. We start by understanding your cooking routine, number of appliances, and the type of meals you prepare. We then plan kitchen workflow zones that help you work with less movement and less clutter.

Our team studies BTO units across Singapore, so we know how each floor plan behaves. We handle small BTO kitchen layout issues, galley kitchen BTO designs, open concept kitchen plans, and custom storage needs. This local experience helps you avoid kitchen layout mistakes that cause poor movement, blocked walkways, or hard to reach cabinets.

You can also request drawings that show your sink, hob, and fridge in clear positions. These drawings help you see how the work triangle functions before renovation work begins. This gives you confidence during planning because you can predict how the space will feel.

Many homeowners also come to us with concerns about lighting, power points, or moisture control. We explain what works in Singapore’s climate and what materials stay stable in cooking zones. This helps you plan a kitchen that holds up well over daily use.

You can explore our latest BTO kitchen layout ideas and real project work at
Elpis Interior.
You will find examples from BTO 3 room kitchens, four room kitchens, and larger units across different estates.

When you work with a team that understands how Singapore homes function, you feel more secure about each decision. You also save time because the plan matches your daily needs from the start.

  • Upload floor plan (if any)
  •  

Accreditation

Tengah BTO Renovation Ideas: Sustainable Interior Design for Singapore’s New Eco-Town

You prepare your Tengah BTO renovation while thinking about cost, space planning, and long term comfort.
You also notice that Tengah is different from older HDB towns, so you want clear and specific guidance.

Many new homeowners want practical direction for Tengah BTO interior design because the estate follows eco town standards.
The expectations for airflow, material quality, and energy usage feel higher, and this can create uncertainty during planning.

This guide explains each renovation element in a direct way.
You receive facts, examples, material details, and practical approaches that match Singapore’s climate and HDB rules.

You also find clear references to sustainable BTO materials, Tengah BTO renovation cost factors, and green home renovation Singapore requirements that help you make informed decisions.

You can use this as a Tengah BTO design guide to plan layouts, ventilation paths, and furnishing choices that support long term use.

Design a Home That Hugs You Back

More than walls and furniture — it’s where your kids grow up, where laughter echoes. Let’s plan a space that feels like home. Talk to our designers today.

Elpis interior Design polaroid

Our Partners

Introduction to Tengah’s Eco Town Concept

Tengah sits in Singapore’s western region and follows HDB eco town planning.
The estate includes forest corridors, central parks, and energy saving systems that support community living in a humid climate.

The eco town uses data from the Singapore Green Plan 2030.
The plan aims to reduce emissions by half before 2030, so Tengah applies design rules that support airflow, daylight access, and energy efficiency.

The zones in Tengah follow planned layouts that limit traffic.
Residents move through shared paths, cycling routes, and greenways that reduce noise and improve air quality.

This planning affects your renovation choices.
BTO reno ideas Singapore follow the natural context of the estate, so homeowners select layouts that support steady ventilation and stable indoor temperatures.

A new flat in Tengah allows you to set up a home that respects eco guidelines.
This means careful planning for cabinetry placement, light direction, and material selection.

The concept of an eco town also influences Tengah BTO renovation cost.
Sustainable finishes and certified materials sometimes cost more at installation, but many offer longer lifespans and lower maintenance needs.

When you follow the guidelines for an HDB eco town renovation, your home functions well across day, night, and yearly climate patterns.
This gives you predictable comfort during warm and humid periods.

Plan your Tengah BTO renovation with a consultation that covers airflow, layouts, and material selection.

What Makes Tengah BTO Different

Tengah differs from older estates because every district uses a nature based layout plan.
Blocks stand along green corridors, so many units receive higher daylight exposure and more direct ventilation.

Most Tengah units also include ready spaces that link visually to outdoor areas.
This changes how you plan storage, furniture, and sightlines within the home.

Tengah BTO interior design often includes open sight lines so natural light reaches deeper into rooms.
This reduces daytime energy usage in high use spaces such as the living room, kitchen, and bedrooms.

The estate includes centralised cooling in selected districts, smart systems for heat response, and planned tree coverage.
You can reduce heat gain by placing blinds and curtains in a clear pattern that follows sunrise and sunset.

The design of the estate also influences Tengah HDB improvement tips that homeowners apply.
Many use large format tiles, neutral finishes, and simple storage to reduce maintenance in humid weather.

When you plan a Tengah BTO renovation, you also review airflow paths at unit boundaries.
Many units support cross ventilation because openings align along opposite sides of the flat.

Many residents use eco friendly BTO renovation ideas that include energy saving appliances and low VOC coatings.
These choices support indoor air quality and match the purpose of an eco town.

You can also review upcoming HDB projects on the official Singapore site at
HDB.gov.sg for comparison of unit layouts and features in nearby estates.

Appealing to Family Lifestyles with Tengah’s Unique Attributes

A family that lives in Tengah benefits from the outdoor network of parks and green routes.
Many parents plan interior layouts that give clear lines of movement so children move easily between study zones and shared spaces.

Layout and Design Considerations

Tengah units follow layouts that support natural airflow.
You plan your renovation with this in mind because ventilation affects comfort in Singapore’s humid conditions.

Many homeowners choose open layouts that connect the living area and dining zone.
This creates a clear path for air movement between opposite openings in the flat.

You also review ceiling height and light direction.
Units with higher daylight exposure let you reduce daytime electricity use, and this lowers long term operating cost.

Some residents install sliding panels instead of swing doors.
This helps maintain airflow across shared rooms while saving space in narrow corridors.

You can support airflow by placing storage lines along walls instead of the center of the room.
This prevents blockage of ventilation paths and keeps movement steady.

Many homeowners check Tengah BTO renovation cost factors early in planning.
Costs vary when you include carpentry, flooring replacements, and energy efficient fittings, and this helps you prepare a clear budget.

If you want direction for kitchen setups, you can review
BTO kitchen design ideas.
These ideas explain cabinet spacing, ventilation hood capacity, and placement of high use appliances.

Families who work from home review study placement.
A study placed near a window reduces eye strain and supports stable lighting during long working hours.

This section covers structural planning.
The next section presents a detailed comparison between traditional BTO layouts and Tengah eco town features.

Comparison: Traditional BTO vs Tengah Eco Town Interior Features

Aspect Traditional BTO Renovation Tengah BTO Renovation
Ventilation Standard window alignment with limited cross flow Openings planned for stronger cross ventilation in tropical climate
Connection to Nature Limited outdoor visibility in most units Larger openings that provide clear views of greenery in the estate
Material Use Common laminate or vinyl with basic coatings Sustainable BTO materials that support indoor air quality
Community Interaction Private unit layout approach Designs that encourage visual openness between indoor and outdoor areas

This table shows the practical differences between a typical BTO and a Tengah BTO unit.
You see how the eco town layout affects renovation choices across airflow, lighting, and material planning.

Many homeowners use this data to design practical Tengah BTO interior design plans.
These plans support ventilation, durability, and consistent indoor comfort.

The next section explains sustainable materials and finishes that match HDB eco town renovation rules.

Sustainable Materials and Finishes

Sustainable materials support healthy indoor conditions in Singapore’s climate.
Many homeowners choose materials with lower emissions and higher durability because humidity affects long term stability.

Homeowners often select bamboo for flooring because it is stable and fast growing.
Bamboo panels handle moisture better than some composite products and require simple maintenance.

Some residents use lime based wall coatings instead of synthetic paint.
These coatings release fewer compounds and support stable indoor air quality in sealed rooms.

You also find reclaimed wood options from certified suppliers in Singapore.
These pieces bring strong density and reduce material waste during construction.

Many residents review low VOC paints for bedrooms and study zones.
This reduces chemical exposure and keeps indoor conditions steady for long use.

You also see more use of locally sourced tiles.
Local supply chains shorten transport distance and lower carbon emissions linked to shipping.

Eco friendly BTO renovation ideas include energy saving lamps, efficient water fittings, and low heat appliances.
LED systems reduce heat production, and this keeps rooms cooler during long daytime use.

Some homeowners install smart sensors for lighting and temperature control.
These systems track daily patterns and adjust output to reduce unnecessary energy use.

You can refer to
NEA Singapore
for guidelines on indoor environmental quality and recommended standards.

This section explains the sustainable materials you can use.
The next part covers case ideas and examples that show how these materials work in Tengah BTO homes.

Case Ideas and Mini Gallery of Inspired Tengah BTO Interiors

You can review sample ideas to see how Tengah BTO interior design works inside actual units.
These examples follow airflow planning, daylight use, and eco town guidelines.

A living room in a Tengah flat often uses simple storage lines with low height cabinets.
This keeps the airflow clear and allows daylight to travel across the room in a consistent pattern.

Some homes use vertical greenery inside the living zone.
This supports indoor air quality and matches the wider estate that includes forest corridors and green routes.

Dining areas often use compact tables with strong surfaces that handle humidity.
Residents select bamboo or engineered wood because these materials resist moisture changes.

A Tengah kitchen usually includes wide counter space for daily cooking.
Homeowners select induction cookers, energy saving refrigerators, and water efficient taps that support green home renovation Singapore goals.

Bedrooms in Tengah flats often place the bed along the shorter wall to support clear movement.
Low VOC coatings help keep indoor air stable during rest hours.

Some residents add simple study corners along the window side of the bedroom.
This provides consistent daylight and reduces energy consumption during long study sessions.

You can use these case ideas when planning your own home.
They help you estimate Tengah BTO renovation cost and select practical BTO reno package Singapore options.

The next section explains the process used by Elpis Interior for Tengah projects.

Elpis Interior’s Approach for Tengah Projects

Elpis Interior reviews your lifestyle, budget, and layout during the first consultation.
You can share routines, furniture needs, and long term plans so the design reflects daily use.

The team studies airflow paths, natural light direction, and wall structure inside the unit.
This helps prepare a renovation plan that supports ventilation and reduces energy use through stable planning.

Elpis Interior explains material choices in clear terms.
You receive data on durability, maintenance, and suitability for Singapore’s humidity, so your selection matches long term needs.

Many residents ask for help with Tengah BTO interior renovation Singapore standards.
The team checks HDB rules and ensures all work follows compliance requirements.

The firm also prepares step by step schedules that show work duration and key handover dates.
This gives you a predictable timeline that matches your move in plan.

You can request support for furniture planning, appliance placement, and storage layout.
These steps complete the renovation flow and create a stable home environment.

You can contact Elpis Interior through
their enquiry page
to review your Tengah BTO renovation plan.

This completes the guide on Tengah BTO renovation ideas.
The next block contains the structured data for search engines.

  • Upload floor plan (if any)
  •  

Accreditation


BTO Renovation Budget Checklist Singapore: Practical Cost Planning & Smart Design Allocation Guide

If you’ve just received the keys to your BTO flat in Singapore, you’re probably feeling both excitement and pressure. Turning that empty space into a home that feels right is a major step—and for many first-time homeowners, managing renovation costs can quickly become a source of stress.The truth is, renovation in Singapore often comes with hidden fees, unclear priorities, and choices you may not be ready for. Without a clear renovation budget checklist, it’s easy to overspend in areas that don’t matter and forget essentials that do.
 

At Elpis Interior, we’ve seen how budgeting confusion can take the joy out of a renovation. That’s why we’ve created this guide, built for homeowners like you. Whether you’re planning a minimalist 3-room flat or a spacious 5-room layout, this article will help you prepare a BTO renovation budget checklist that makes sense—for your home, your needs, and your wallet.

Why Budgeting Early Matters for Your BTO Renovation

One of the biggest mistakes new homeowners make is leaving budgeting until too late. It’s easy to get caught up in Pinterest boards, furniture shopping, or moodboards before understanding what you can realistically spend—and where.

We’ve worked with couples who come to us mid-renovation, surprised by how quickly costs snowball. A feature wall here, better tiles there, or extra carpentry—and suddenly, the project is 20 to 30 percent over budget.

By setting your renovation budget early, you make each decision from a place of clarity. You’ll know which elements are must-haves, which ones can wait, and where compromises make sense. It also gives you space to plan for a safety buffer, which is essential for any renovation in Singapore.

It’s not about restricting creativity. It’s about creating a structure that lets your design serve your daily life—not just the Instagram photo.

Elpis interior Design polaroid

Major Cost Categories in Your BTO Renovation Budget

Let’s break down the typical categories that make up a complete BTO renovation budget in Singapore. Whether you’re doing a light refresh or a full makeover, these components will shape most of your costs.

Carpentry and Built-Ins

Custom carpentry usually takes the largest portion of your renovation budget—sometimes up to 50 percent. It includes kitchen cabinets, wardrobes, shoe racks, TV consoles, and other fixed furniture.

For example, a kitchen cabinet set with laminate finish can cost around $4,000 to $6,000. Bedroom wardrobes might range between $1,800 to $4,000 depending on length and materials. Carpentry isn’t just about aesthetics. It’s about storage and long-term function. So investing here makes sense—if it matches your living habits.

Materials and Finishes

This covers flooring, wall tiles, paint, surface laminates, and other finishing touches. The choice between vinyl, tile, or engineered wood flooring can create a swing of $3,000 to $8,000 across the entire home.

Homeowners often underestimate how small upgrades here can add up fast. For instance, upgrading to herringbone tile for a bathroom wall may cost hundreds more—but if that space matters to you, it could be worth it. Budget about 20 to 30 percent of your renovation for materials and finishes.

Labour and Services

This includes fees for tilers, electricians, painters, and the general renovation contractor. Labour costs in Singapore typically make up 20 to 30 percent of the total budget.

If you’re planning a full renovation involving hacking or plumbing work, labour charges will be on the higher end. Choosing a licensed contractor ensures quality and reduces the risk of rework or compliance issues.

Appliances and Fixtures

Lighting, ceiling fans, water heaters, and kitchen appliances also eat into your budget. While these are not technically part of renovation work, they’re necessary for move-in readiness and often overlooked in the early planning stages.

We suggest allocating 10 to 15 percent of your budget for appliances and fittings. It’s also wise to align purchases with seasonal sales, which can help you save without compromising quality.

Want a deeper breakdown of projected renovation prices for each area of the home? Check out our latest BTO Renovation Cost Breakdown 2025.

Checklist for Different BTO Flat Types: Tailoring Your Budget

Every flat type in Singapore brings a different set of needs. A 3-room BTO might require more space-saving carpentry, while a 5-room unit allows for layout enhancements and visual features. So your renovation budget checklist needs to reflect those variations clearly.

We’ve worked with homeowners across all flat sizes, and these benchmarks often help in early planning:

Flat Type Typical Size (sqm) Estimated Renovation Budget Range (SGD) Key Focus Areas
3-Room BTO 65–70 $20,000 – $35,000 Compact storage, space-saving furniture, minimal built-ins
4-Room BTO 90–95 $30,000 – $50,000 Balanced carpentry, smart lighting, functional zones
5-Room BTO 110–120 $40,000 – $60,000+ Statement features, expanded kitchen, built-in wardrobes


These figures cover general renovation costs excluding furnishings or appliances. For a personalised estimate, you can also explore our HDB renovation guide for breakdowns based on room count and design focus.


Smart Budget Allocation: Balancing Design, Function, and Buffers

Once you’ve set your budget, the next step is deciding how to divide it. The best renovation plans always come back to one thing—balance. Functional needs, design expression, and unexpected costs should all have space in your planning.

Here’s a practical guideline we recommend to clients for allocating a BTO renovation budget:

Budget Component Recommended Allocation (%) Purpose
Function (Carpentry, Plumbing, Electrical) 50–60% Supports daily living and space usage
Design (Finishes, Lighting, Styling) 25–35% Shapes mood and personal feel
Contingency Buffer 10–15% Cushions unexpected changes or upgrades


If you’re unsure what counts as functional versus decorative, try this: ask yourself if the item directly affects your comfort or efficiency at home. If yes, it likely belongs in the functionality category.

Smart allocation isn’t about limiting expression—it’s about supporting your daily needs first, then letting the design enhance them. When your renovation budget respects both, your home simply works better for you.

Avoiding Hidden Costs: Transparency is Key

No homeowner likes surprises during renovation. Unfortunately, unexpected costs are common when the initial planning skips details.

We’ve seen homeowners caught off guard by extra wiring needs, plumbing reroutes, or structural adjustments that weren’t part of the initial quote. That’s why your renovation checklist should include line items for commonly missed costs.

Here are some examples of what to prepare for:

  • BCA-related submission or permit fees, especially for hacking or structural work
  • Plumbing or electrical rewiring to meet updated building codes
  • Additional carpentry for irregular layouts or last-minute functional tweaks
  • Extended warranty coverage or insurance on renovation works

Make sure to ask your contractor or designer to break down their quotation in detail. A good rule is: if it’s not written down, it’s not included.

At Elpis Interior, we always present itemised budgets to reduce confusion. Our aim is not only to avoid cost overruns—but also to build trust with you through clear expectations.


How Elpis Interior Helps Keep Your Renovation Budget on Track

Sticking to your renovation budget in Singapore can feel like walking a tightrope. One unexpected item or delay can throw your plans off balance.

That’s why many homeowners turn to renovation partners who don’t just design beautiful spaces—they keep the numbers in check, too. At Elpis Interior, we take that responsibility seriously.

Every client starts with a budget conversation. We ask about your priorities, your non-negotiables, and where you’re open to trade-offs. From there, we build a detailed renovation checklist that fits your flat type, family size, and lifestyle goals.

Here’s how our team ensures your renovation in Singapore stays within budget:

  • Clear itemised quotations, so you know exactly where every dollar goes
  • Cost-conscious design proposals that match your lifestyle, not generic packages
  • Built-in buffers to handle scope changes or material availability shifts
  • In-house project managers who keep communication smooth and decisions fast
  • On-site coordination between contractors and designers to prevent costly rework

We believe your renovation budget shouldn’t be something you fear—it should be a tool that gives you freedom. With the right planning, you don’t need to overspend to get a home that looks and feels like you.

If you’re ready to build a renovation budget checklist that supports your vision and your wallet, we’re here to help. Speak with a designer who listens, guides, and gives you clarity from the first sketch to the final handover.

Book a consultation with Elpis Interior today and start your journey with confidence.

Lengkong Dua

Property Type : Landed
Designer : ZhiQi Lee & Frederick Chow

Champion Way

Property Type : 4room New BTO
Designer : Jason Lee & Audrey Poh

No more posts to show

Your renovation should fit your life, not just your layout. Let’s make that happen together.

HDB Renovation Timeline in Singapore: Step-by-Step Stages from Key Collection to Move-In by Elpisinterior

Renovating a new HDB flat is exciting, but it can feel overwhelming. Especially when you’re unsure how long each step takes or what comes next. This guide breaks it down clearly.

If you’ve just collected your keys, you might feel both thrilled and uncertain. The HDB renovation timeline Singapore isn’t always straightforward, and if it’s your first time, the number of decisions ahead might feel like too much. From layout changes and permits to carpentry and cleaning, each step needs coordination.

That’s where Elpisinterior steps in. We’ve guided hundreds of homeowners through this exact journey. With the right planning and clear communication, your HDB renovation Singapore doesn’t have to be a guessing game.

We believe your home should reflect your lifestyle. By outlining every major stage in the HDB renovation timeline, this guide gives you a better sense of what to expect—so you can move in with confidence.

Design a Home That Hugs You Back

More than walls and furniture — it’s where your kids grow up, where laughter echoes. Let’s plan a space that feels like home. Talk to our designers today.

Elpis interior Design polaroid

Our Partners

Why Timeline Matters in Your HDB Renovation Journey

Time is one of the biggest concerns for new homeowners. You might be paying rent while waiting to move. Or trying to align your renovation around work or school holidays. Delays cause stress and cost.

Based on BCA data in Singapore, most HDB renovations take around 8 to 12 weeks. But this depends on how complex your project is. Planning early gives you a better chance of avoiding setbacks.

A clear renovation timeline helps you:

  • Schedule move-in and furniture deliveries smoothly
  • Stay within budget by reducing last-minute changes
  • Coordinate handovers with your contractor without stress

When you know what’s coming next, you’re less likely to feel rushed or confused. That’s why having a guide for each step of your renovation in Singapore is more important than ever.

Pre-Renovation Stage: Planning, Design, and Permits

Everything starts after key collection. The first few weeks are about understanding your space and defining your goals. You’ll meet with designers, compare quotes, and begin sketching out how your home will look.

This is also when you begin applying for HDB permits. If your renovation includes hacking or plumbing changes, HDB requires approved plans before any work begins. This process alone can take 2 to 3 weeks.

During this phase, we recommend:

  • Scheduling a site visit with your chosen designer
  • Sharing your lifestyle needs (e.g. working from home, young children, elderly parents)
  • Choosing layout concepts, colour schemes, and materials

At Elpisinterior, our team also prepares a detailed renovation proposal. This includes an estimated timeline, scope of work, and full cost breakdown. You’ll know exactly what to expect before you sign anything.

Many homeowners skip this early planning or rush into hacking. That often leads to design changes later, which delay the project and inflate costs. Taking the time now reduces stress later.

Understanding Permit Requirements

HDB requires approval for specific works—especially if you’re removing walls, changing tiles, or shifting toilet fixtures. Submitting incorrect plans can delay your renovation by weeks.

Elpisinterior handles this entire process for you. We submit forms, prepare drawings, and track approvals so you don’t have to worry about technical details. On average, HDB permit approval takes around 14–21 days.

You can learn more about the permit process via HDB’s official renovation permit portal.


Setting a Clear and Realistic Budget

Every homeowner wants to avoid budget overruns. Yet it’s common to underestimate costs due to missing items or unexpected work. That’s why we build a detailed cost plan right from the start.

At this point, we’ll help you include:

  • Material choices and brand-level pricing
  • Labour, permit, and project management fees
  • Contingency buffers (we recommend at least 10%)

A good budget doesn’t just reflect your design goals. It keeps the project on track and avoids sudden trade-offs midway. With a full breakdown, you’ll make decisions more confidently.

If you’d like a personalised estimate, we provide free consultations. You can book one here.

In the next section, we’ll walk you through what happens once permits are cleared and hacking begins—where timelines can speed up or stall depending on how prepared your team is.


Permit & Hacking Stage: Structuring Your Space

Once permits are approved, renovation work officially begins. This starts with hacking—removing existing tiles, fixtures, or walls to make way for your new layout.

For most HDB flats in Singapore, the hacking phase lasts about 1 to 2 weeks. If your design involves major changes like open-concept kitchens or walk-in wardrobes, the duration may be slightly longer.

This phase also involves site preparation and coordination between contractors. Plumbing lines may be rerouted, and flooring is stripped before tiling begins.

Here’s what to expect during this stage:

  • Clearance and removal of existing tiles and fittings
  • Structural hacking (if permitted) for walls or openings
  • Inspection of electrical points and plumbing routes

Good project coordination here prevents timeline slippage. At Elpisinterior, we assign a project manager to supervise daily progress and update you regularly.

You’ll also get photos and schedule updates via WhatsApp or email, depending on your preference. It keeps you in control, even if you’re not on-site.

Why This Stage Sets the Pace for Everything That Follows

Many renovation delays happen here due to missing approvals or inaccurate hacking works. That’s why we double-check all design measurements and structural drawings before starting.

Once your layout is ready and surfaces are cleared, carpentry, electrical, and tiling can move forward without hiccups. Think of this as the reset button before the build begins.

Carpentry & Finishing Stage: Bringing Your Vision to Life

This is where your renovation starts to look like a real home. From built-in wardrobes and kitchen cabinets to flooring, lighting, and feature walls—every element comes together here.

The carpentry and finishing phase typically takes 4 to 6 weeks. The actual duration depends on the number of custom elements and the complexity of materials used.

Here’s what’s involved during this phase:

  • Electrical wiring and lighting installations
  • Flooring and tiling works
  • Painting and wall treatments
  • Built-in carpentry (TV consoles, wardrobes, kitchen)

We provide 3D renders before final fabrication, so there are no surprises. You’ll approve materials, finishes, and measurements before anything gets made.

Site supervision is especially important here. We perform quality checks after every trade completes their work. This avoids conflicts like tiling misalignments or cabinet gaps.

By now, your home will look nearly complete—but you’ll still need one final phase before move-in.

Move-In Readiness Checklist: Final Steps Before Settling In

Once construction is complete, we begin the handover phase. This stage typically takes 1 to 2 weeks and includes everything from deep cleaning to final fixes.

We recommend preparing a checklist with your designer to track the final steps:

  • Electrical testing and appliance setup
  • Aircon installation or servicing
  • Window and grilles cleaning
  • Soft furnishing placement (e.g. curtains, mirrors, fittings)

During your final walkthrough, we’ll review workmanship together. If you spot any issues—like scratched panels or loose tiles—we fix them before move-in.

This ensures you move into a clean, safe, and complete home, not a worksite.

You can also refer to our downloadable HDB renovation handover checklist to prepare your inspection.

In the final part, we’ll share how to prepare for delays and buffers, plus what makes Elpisinterior’s renovation planning different.

Buffer Planning & Potential Delays: Preparing for the Unexpected

Even with a clear HDB renovation timeline, delays can still happen. Weather, supplier backlogs, permit revisions, or manpower shortages are common causes in Singapore.

That’s why every realistic renovation plan includes a buffer. We advise our clients to add 2 to 3 weeks beyond the estimated timeline.

These buffer weeks absorb any delays without affecting your planned move-in date. It’s especially useful if you’re coordinating furniture delivery, end-of-lease transitions, or family arrangements.

Our project managers track your progress weekly. If something gets delayed, you’ll be informed early, along with alternatives or revised dates.

Here’s how we help you stay ahead of schedule problems:

  • Early permit applications to avoid last-minute rejections
  • Approved suppliers with stock-on-hand materials
  • Contingency plans for subcontractor availability

The goal isn’t just to finish quickly—it’s to finish right, with quality that lasts. That’s the reason we build in flexibility from the start.


Why Choose Elpisinterior for Your HDB Renovation Timeline Process?

We’ve helped hundreds of homeowners across Singapore complete their renovation without stress. At Elpisinterior, timelines are not just a goal—they’re a responsibility.

Our HDB renovation team includes designers, project managers, and site coordinators who work together to get things done on time. We’re experienced in HDB regulations and know how to design around space, budget, and rules.

When you partner with us, here’s what you can expect:

  • Step-by-step HDB renovation timeline Singapore that fits your unit’s size and complexity
  • Clear permit guidance and application support
  • Designs that balance function and style
  • Frequent updates, photos, and walkthroughs
  • Post-handover support and renovation warranty

Whether you’re planning for a new BTO flat or resale HDB renovation, our team helps you manage each stage clearly and calmly.

Interested in renovation ideas before your flat is ready? Browse our project portfolio or explore upcoming BTO launches and prepare early.

If you’re looking for a renovation in Singapore that respects your time, budget, and lifestyle, talk to Elpisinterior today.

We’ll guide you from the first design sketch to the final move-in, always on schedule and without confusion.

Your home is a big chapter in your life. Build it with confidence.

Lengkong Dua

Property Type : Landed
Designer : ZhiQi Lee & Frederick Chow

Champion Way

Property Type : 4room New BTO
Designer : Jason Lee & Audrey Poh

No more posts to show


Difference Between BTO and Resale: Renovation Perspective

When you’re scanning the property listings in Singapore and you see “new BTO” vs “resale HDB”, you might feel the weight of the decision: do you wait years and start fresh, or move in quickly and renovate immediately? If you are planning your first HDB renovation in Singapore, you want clarity—not just on costs and design styles, but on how the type of flat will shape your renovation path.

Here at elpisinterior Interior Design, we understand the thrill and the overwhelm of turning a flat into a home. Your living space should reflect your lifestyle and tastes, but it also needs to fit your budget and timing. Whether you are choosing a brand-new BTO unit or a resale flat in a mature estate, your renovation journey starts with understanding the differences clearly—and that’s what this guide will help you do.

Read on and by the end you’ll feel confident about which direction fits you better, how to plan your renovation, and how to avoid costly mistakes.

Design a Home That Hugs You Back

More than walls and furniture — it’s where your kids grow up, where laughter echoes. Let’s plan a space that feels like home. Talk to our designers today.

Elpis interior Design polaroid

Our Partners

Understanding BTO and Resale Flats in Singapore

You might be wondering: what exactly is a BTO flat and how is it different from a resale HDB flat? Let’s walk through this.

A Build-To-Order (BTO) flat is a new public housing unit offered by the Housing & Development Board (HDB) under a batch launch. When you apply, you enter a ballot process and wait for construction. Typically you wait around 3 to 5 years before you can move in.

A resale flat, in contrast, is an HDB unit that has already been built, lived in, and is now being sold on the open market. It offers immediate availability (once purchase formalities are done) and normally a wider location choice, especially in mature estates.

From a renovation perspective, this difference matters a lot. With a BTO you often start with a “blank sheet”-like unit, whereas a resale flat will come with existing finishes, fixtures, and wear and tear that you must evaluate. The renovation scope, timing, and cost will shift accordingly.

Here are some quick facts to mark the landscape:

  • Eligibility, grants, and subsidy rules differ between BTO and resale.
  • Purchasing price tends to differ: BTO often lower in outset though subject to waiting; resale often higher but you get move-in now.
  • Leaseage: BTO always starts with full 99-year lease; resale may have fewer years remaining which affects value and renovation decisions.

So if you are looking to renovate, one of your first questions should be: “When can I start?” and “How much change will I need to make?” Your answers vary significantly depending on BTO vs resale.


Renovation Timeline Differences: Patience vs. Urgency

Let’s talk about your schedule. If you need to move in soon, or you prefer planning slowly, that will guide your decision.

If you choose a BTO unit, you’ll generally have a waiting period of around 3 to 5 years from application to hand-over of keys. During that wait you have time to plan your renovation, pick materials, engage a designer, and refine your layout ideas. That can feel good—you’re not rushed. But it also means you **start living** later.

In the renovation context, that waiting means less pressure to dive into decisions immediately. You can take your time to budget, choose finishes and work with an interior design team without the clock running fast.

On the other hand, a resale flat typically allows you to move in much faster—once transaction formalities are done (loan approval, HDB resale completion) you might have keys in weeks rather than years. That means your renovation often has to ramp up quickly. Many homeowners purchase a resale flat and aim to complete renovation within a few months. Because the flat might come with older systems (electrical, plumbing) or design features you want to change, that rush can impact cost or decision quality.

Here are the practical takeaways from the timeline viewpoint:

  • If you have a long-term plan (5-10 years) and you’re okay with waiting, a BTO gives you breathing room for renovation.
  • If you need to move quickly (for example due to job relocation, family need), a resale flat gives you flexibility—but expect tighter renovation timelines.
  • In a resale scenario you’ll want to engage your interior designer **early**—right after purchase—to avoid losing time.

Promise: When you align your move-in timeline and renovation readiness with the flat type, you reduce stress and get smoother outcomes.


Layout and Design Flexibility: Blank Canvas vs Established Footprint

One of the biggest renovation questions is: “How much can I change?” The flat type affects that a lot.

With a BTO flat you’re essentially working with a new unit: standard HDB design, fresh structure, modern wiring, new plumbing. That gives you a lot of flexibility. You can plan your layout from scratch, including built-in storage, open plan living, custom joinery, smart home wiring. You don’t have to deal with old wall moves or hidden defects.

In contrast, a resale flat means the unit comes with an existing footprint—walls, fixtures, maybe older finishes—and if you want to make big structural changes (for example, moving walls or changing plumbing runs) you might run into cost, regulatory or logistical constraints. Older flats may also have quirks—odd layouts, awkward corners, or legacy pipe runs—that your designer needs to work around. But those quirks can also be turned into character features.

Let’s break down key layout & design factors:

Aspect BTO Flats Resale Flats
Structural change freedom High flexibility, new finishes, minimal repair work Less flexibility without major cost, must evaluate live-in condition
Existing fixtures and finishes Bare or semi-finished unit, design starts fresh Existing walls, finishes, may need removal or upgrade
Custom layout options Wide options: open plan, built-in wardrobes, integrated tech Depends on current layout; may need creative design to re-configure
Electrical & plumbing baseline Modern systems, fewer hidden issues May need rewiring, plumbing replacement or flooring/hacking
Unit age and condition Brand new (0 years), minimal wear & tear Often 5-30 years or more, wear visible, may need structural check


Design strategy tip: if you go for a resale flat you might want to budget **extra** for unexpected repair or layout rework. If you go BTO you can budget more on design and finishes rather than repair work.

Promise: When you pick the layout approach that suits your flat type, you get a more satisfying renovation rather than wrestling with constraints or budget surprises.


Typical Cost Differences in Renovation

Budgeting for renovation is one of the most stressful parts. Let’s dig into numbers and what drives variation.

In Singapore, when you compare a BTO unit vs a resale HDB flat from a renovation angle, the general trend is this: resale flats often cost more to renovate. Why? Because older units may require more “fix-up” (wiring, plumbing, ceilings) in addition to design work.

Here are recent data points: For both flat types in 2024/2025 renovation budget estimates (Singapore market) show:

  • BTO flats: 3-room units ~ S$36,000-43,700; 4-room ~ S$51,000-61,800; 5-room ~ S$67,000-82,400.
  • Resale HDB flats: 3-room units ~ S$51,000-61,800; 4-room ~ S$64,300-80,300; 5-room ~ S$84,300-97,000.

So if you are comparing a 4-room BTO vs a 4-room resale, you might find the resale budget needs to be 20-30% higher, depending on the flat’s condition, layout changes and finishes you pick.

Cost drivers to watch:

  • Hacking and removal of old finishes (walls, floor, cabinets) in resale units.
  • Electrical rewiring and plumbing replacements in older flats.
  • Structural changes: wall removal, ceiling adjustments, smart home wiring.
  • High-end finishes: built-in joinery, stone countertops, designer lighting.
  • Contingency budget: always set aside at least 10-15% for items that pop up during work.

For BTO flats you may get away with a leaner renovation because you start fresh—but don’t skip budgeting wisely. Even a new unit needs careful design and quality finishes.

Tip: When you meet your interior firm, ask for the scope breakdown: base cost + design fees + joinery + mechanical/electrical/workmanship + contingency. Make sure you compare apples to apples when comparing quotes for BTO vs resale units.

Promise: When you track renovation costs based on flat type and take into account condition and scope, you stay within budget and avoid surprise cost jumps.


Design Style Aspirations: What Works Best for BTO and Resale Flats

The unit type also influences the design styles that will work smoothly. Let’s explore how you can align your design aspirations with flat type.

If you go with a BTO flat, you’re working with a new shell. That means modern minimalist, Scandinavian, Japandi styles often fit beautifully—clean lines, neutral palettes, smart storage systems, integrated tech. Because you’re starting from scratch, you can plan layout, storage and lighting from day one. And you can align finishes consistently across the home.

For a resale flat you may be dealing with older finishes, legacy fixtures or layout quirks—but that also brings opportunity. You can adopt transitional or modern-classic styles that build on character features (for example, larger unit size in a mature estate) while addressing dated elements. Feature walls, bespoke joinery, lighting upgrades and clever colours can revivify a resale flat without blowing your budget.

Here are design considerations for each scenario:

  • BTO units: Use the new layout to plan built-in storage from day one; select finishes early while construction is on. Consider future family needs if you expect to stay long-term.
  • Resale units: Assess condition first—flooring, ceiling, windows. Use design to cover or adapt old elements smartly. Use lighting and joinery to modernise without full structural overhaul.
  • In both cases, ask: how many people live here? What kind of storage do you need? Do you host often? Will you work from home? These questions should shape design decisions, not purely aesthetics.

At elpisinterior we guide homeowners to match design style to flat type and lifestyle. That means you don’t pick a style in isolation—you choose a style that works with your unit and your life.

Promise: When you align your design style with the flat type and your lifestyle, your home will feel cohesive, functional and comfortable—not forced or mismatched.


How elpisinterior Supports Renovations for Both BTO and Resale Flats

You may now have a clearer sense of how BTO and resale options differ from a renovation perspective. But how do you turn that sense into action? That’s where working with an interior design firm that understands these differences matters.

Here’s how we at elpisinterior Interior Design support clients whether they choose BTO or resale flats:

  • Initial consultation: We meet you to assess your needs, lifestyle, budget, and timeline. For BTO clients we map the waiting period and design roadmap. For resale clients we survey condition, layout, and costs early.
  • Personalised design solutions: For BTO units we recommend layout planning ahead of hand-over, joinery and material selection early. For resale units we propose phased renovation options, cost-control strategies, and condition remediation.
  • Project management: We coordinate the trades (carpentry, plumbing, electrical), monitor timelines, quality control. Especially for resale flats with tighter schedules, this helps avoid delays and cost creep.
  • Transparent costing: We provide detailed quotations, breaking down materials, labour, joinery, contingency. Helps you compare BTO vs resale budgets fairly and decide with clarity.
  • Craftsmanship and finish quality: Whether your unit is new or older, we ensure finishes meet expectations—neat, functional, beautiful. Because at the end you want a home you love living in every day.

We invite you to explore our full portfolio of past projects and client testimonials to see how we support homeowners across Singapore. View portfolio

Promise: When you engage an interior firm that understands the difference between BTO and resale, you don’t just renovate—you craft a home that fits your flat type, budget, timing and lifestyle.

How We Can Help Your Renovation Journey?

Get a transparent quote in 24–48h (no hidden costs)

  • Upload floor plan (if any)
  •  

Frequently Asked Questions

Why should I hire an interior design firm when I can manage the renovation myself?
Sure, some homeowners prefer to DIY or coordinate with contractors directly—but here’s the thing: renovation in Singapore isn’t just about choosing tiles or paint. It’s about permits, HDB guidelines, space planning, lighting, and hundreds of decisions that can quickly become overwhelming. Hiring a firm means having a team that takes care of everything—project management, technical compliance, and design synergy—so you avoid costly mistakes and delays. More time for you, less stress, and a stunning result that looks like it came from a magazine? That’s a win.
Isn’t hiring an ID firm expensive?
It depends on who you work with. Not all ID firms are out to burn your wallet. A good firm will help you make smarter, cost-effective decisions that stay within budget without cutting corners. Plus, our transparent pricing means no hidden costs—just value for every dollar spent. Sometimes, spending wisely now saves you from overspending later.
What if I already have my own ideas or moodboard? Will the ID still help?
Absolutely—we love when homeowners bring their vision to the table! Think of us as your creative partner. We take your inspiration and elevate it with layout planning, material sourcing, and cohesive styling to ensure it works in real life, not just on Pinterest. Our job isn’t to override your ideas, but to bring them to life beautifully and practically.
How long will the renovation take if I hire an ID firm?
With an ID firm, timelines are managed professionally. While every project varies, having a team to coordinate with vendors, contractors, and suppliers keeps everything on track. You won’t have to chase after multiple parties—we do the heavy lifting, so you can move in faster and smoother.
How do I know if an ID firm is reliable?
Great question. Look out for HDB-licensed firms, transparent reviews, detailed portfolios, and clear contracts. A reliable ID firm won’t just promise a good-looking home—they’ll prove it with process, professionalism, and people who genuinely care about your home. Ask about past projects and how they handle after-sales service. That’s where true reliability shows.

BTO Renovation Cost Breakdown Singapore 2025

Stepping into your freshly-keyed BTO flat in Singapore can feel thrilling and daunting at the same time. You’re imagining a home that fits your family, but you also feel the weight of costs creeping in. You’re the hero of this story, and you want to build a place that reflects your way of living without being blindsided by budget surprises.

We at Elpis Interior have walked this path many times. We’ve heard the questions. We’ve seen the budgets drift. We know what good planning looks like. My job here as your guide is to bring clarity and control back into this process. By the end of this article you’ll understand realistic cost ranges, know what drives your spending, and feel confident in setting a budget that works for you in the Singapore market.

Let’s begin.

Design a Home That Hugs You Back

More than walls and furniture — it’s where your kids grow up, where laughter echoes. Let’s plan a space that feels like home. Talk to our designers today.

Elpis interior Design polaroid

Our Partners

Current Market Cost Ranges for BTO Renovations in Singapore

You’ve just got your keys for your new HDB BTO flat. You want a home that matches your lifestyle. But you also want cost certainty. That’s your struggle. What we’ll do together is break down real-world figures in Singapore so you can place yourself on the cost spectrum, then find where you should sit.

Here are typical cost ranges for BTO (Build-To-Order) flats across sizes in Singapore (2025). These ranges cover standard renovations including carpentry, hacking, tiling, lighting, and general fittings:

Flat Type Average Renovation Cost (SGD) Typical Range (SGD)
3-Room ~$20,000 $15,000 – $25,000
4-Room ~$30,000 $25,000 – $40,000
5-Room ~$40,000 $35,000 – $50,000+


These figures assume standard materials and moderate layout adjustments. If you choose luxury finishes, bespoke carpentry or smart-home features, expect the budget to move higher. The point here is not to scare you but to give you anchors.

Knowing these cost brackets helps you align your design ambitions with your wallet. You can choose: are you going entry-level, mid-range, or premium? And you can decide what trade-offs you’re comfortable with. That way you don’t wake up mid-project with sticker-shock.

Primary Cost Drivers: Decoding Material Choices, Carpentry, Hacking, and Appliances

You likely feel the pressure of “what exactly am I paying for?” When you look at a quote, you might see line items you don’t recognise. That’s where we step in. I’ll walk you through major cost buckets so you get what each means, and you can make decisions with eyes open.

Materials and Finishes

The materials you pick set the tone of your home—and the cost. We’ve seen homeowners spend significantly more simply because they picked marble instead of good quality porcelain tile—or engineered wood instead of laminate. It works both ways.

Here is how you can think about materials:

  • You can choose standard affordable tiles and laminates and achieve a clean look.
  • You can step up to mid-tier finishes (engineered wood flooring, quartz countertops) for a good balance of cost and quality.
  • You can go premium—full‐height marble wall panels, custom-designed joinery and imported fabrics—but budget will jump accordingly.

A practical tip: decide early on where your material “jump” is worth it. For instance, flooring in shared areas may benefit from mid-tier finishes because it’s used most; guest rooms might stay simpler. That’s how you spend smart.

Carpentry

Custom carpentry often becomes one of the biggest line items. You want storage that fits your family’s habits, wardrobes that adapt, maybe hidden features or built-in furniture. And that’s good—it adds value. But you need to know what you’re paying for.

Here’s how you can approach carpentry:

  • Map out your storage needs in advance—what you and your family use regularly.
  • Focus on the high-traffic zones—living room cabinets, wardrobes in master bedroom—rather than filling every wall.
  • Ask for itemised joinery costs—how much is volume, how much is complexity, how much is finish. That way you know where to adjust.

At Elpis Interior we work with clients to tailor storage solutions that fit flow, function and budget. The promise: you get bespoke carpentry where it matters, cost-effective where it counts.


Hacking and Structural Adjustments

Perhaps you want to open up walls, merge rooms, relocate doors. That’s exciting—but these moves cost time, labour, and extra finishing work. That’s your real challenge. You don’t want structural changes to blow your budget.

Here’s how you can control hacking costs:

  • Define the layout changes you need before quotes. Every change adds cost.
  • Ask your contractor to map out the sequence—hacking, remove debris, new walls/floor repairs, finishing. That gives clearer cost transparency.
  • Consider minimal structural change if you’re more budget-sensitive. Keep major walls intact and use design tricks (like sliding doors) instead of full removal.

The promise here is that by clearly understanding the cost structure for hacking you’ll feel in control—rather than surprised.

Appliances and Fixtures

Finally, the hidden budget leap often comes through appliances, bathroom fixtures and lighting. You want your home to look great and be functional—but feature-rich items add up.

Here are specific actions:

  • Prioritise brand and functionality in the kitchen—dishwasher, hob, built-in oven. These are used constantly, so can be worth spending.
  • Bathrooms—basic fixtures can look fine, but if you want rain-shower, smart toilet, premium tapware, you must plan for the extra cost.
  • Lighting and smart-home integration—these add mood and value. But decide what matters: Do you need full home automation now or can you phase it later?

By understanding that these four buckets (materials, carpentry, hacking, appliances) steer most of your budget, you gain clarity. The promise here: you’ll know where excess levers lie—and you’ll steer them rather than ignore them.

Aligning Budget with Lifestyle and Design Ambition

Every household in Singapore is different. You may be a young couple, a family with children, or multi-generational. Your lifestyle matters. That’s your struggle: design must reflect how you live, not just how you dream.

As your guide, I’ll help you figure out your design ambition in realistic terms. And my promise is: your budget will reflect you—not just generic averages.

Think through these questions:

  • How often do you entertain friends and family? If often, your living and dining areas matter more.
  • Do you work from home? Then your study or flex-room needs priority.
  • Are you minimalist or do you need storage for kids, equipment, hobbies? That drives carpentry costs.

Here’s a scenario: A family of four in a 4-room BTO in Tampines chose a Scandinavian minimalist design. They spent about $32,000—around the mid-range. They chose mid-tier engineered wood for living areas, standard tiles for bedrooms, custom wardrobes in two rooms, but delayed their smart lighting upgrade until year two. Their layout changes were minimal because they accepted the original floorplan. The result? A home that works for their routine, looks clean and modern, and stayed on budget.

Your budget isn’t a number pulled out of thin air. It’s based on choices. When you align design ambition with lifestyle, you allocate money where it counts. And the promise is: fewer surprises, more satisfaction.

Cost-Saving Strategies Without Compromising Quality

You may feel pressure: you want quality, you want design, but you want to keep costs in check. That tension is real. As your guide I’ll walk you through strategies we’ve used with homeowners in Singapore that deliver results. The promise: you save cost and keep result strong.

Here are practical strategies:

  • Phase your renovation. Do essential areas first (kitchen, master bathroom), defer feature walls or guest room finishes.
  • Choose local material alternatives. Importing often costs more. Local high-quality tiles or laminates may perform just as well.
  • Use multi-purpose furniture and smart carpentry. Instead of full-room bespoke joinery, focus on zones you use most.
  • Negotiate quotes carefully. Ask for line-item breakdowns. You’ll see what’s driving cost and you can choose where to adjust.

We worked with one couple in West Coast: they delayed their built-in wardrobes by one year, used semi-custom pieces initially, and reinvested in custom joinery later. They saved about $4,000, without compromising their overall design integrity.

Using smart strategies doesn’t mean settling. It means making deliberate choices. The promise: you’ll spend where it matters, and save where it doesn’t reduce your satisfaction.

How Elpis Interior Delivers Value and Why Quote Transparency Matters

You might still worry: will the quotes hide costs?

Will I really know what I pay for? That concern is valid. And as your guide I’ll show you what transparency looks like—so you walk in confidently.

At Elpis Interior we make sure you receive an itemised quotation. Here’s what we include:

  • Hacking and demolition cost (labour and debris removal)
  • Structural works and wall/floor repair
  • Carpentry: unit count, material type, finish specification
  • Materials: tile sqm, flooring sqm, wall panels
  • Appliances and fixtures: brand/model, warranty, installation cost
  • Contingency buffer (we always recommend adding 5-10% for unexpected items)

You as homeowner get clarity. You ask: why this cost? What happens if I reduce this line? It becomes your choice. The promise: you control your budget rather than being controlled by it.

Engaging us means choosing a partner who listens, plans with you, and implements with care. If you want a BTO renovation in Singapore that balances design, function and costs—reach out via our enquiry page. Your Vision. Our Expertise. Every space begins with listening. Are you ready to make choices you feel confident about?

Let’s start your renovation journey in Singapore with clarity and purpose.

How We Can Help Your Renovation Journey?

Get a transparent quote in 24–48h (no hidden costs)

  • Upload floor plan (if any)
  •  

Frequently Asked Questions

Why should I hire an interior design firm when I can manage the renovation myself?
Sure, some homeowners prefer to DIY or coordinate with contractors directly—but here’s the thing: renovation in Singapore isn’t just about choosing tiles or paint. It’s about permits, HDB guidelines, space planning, lighting, and hundreds of decisions that can quickly become overwhelming. Hiring a firm means having a team that takes care of everything—project management, technical compliance, and design synergy—so you avoid costly mistakes and delays. More time for you, less stress, and a stunning result that looks like it came from a magazine? That’s a win.
Isn’t hiring an ID firm expensive?
It depends on who you work with. Not all ID firms are out to burn your wallet. A good firm will help you make smarter, cost-effective decisions that stay within budget without cutting corners. Plus, our transparent pricing means no hidden costs—just value for every dollar spent. Sometimes, spending wisely now saves you from overspending later.
What if I already have my own ideas or moodboard? Will the ID still help?
Absolutely—we love when homeowners bring their vision to the table! Think of us as your creative partner. We take your inspiration and elevate it with layout planning, material sourcing, and cohesive styling to ensure it works in real life, not just on Pinterest. Our job isn’t to override your ideas, but to bring them to life beautifully and practically.
How long will the renovation take if I hire an ID firm?
With an ID firm, timelines are managed professionally. While every project varies, having a team to coordinate with vendors, contractors, and suppliers keeps everything on track. You won’t have to chase after multiple parties—we do the heavy lifting, so you can move in faster and smoother.
How do I know if an ID firm is reliable?
Great question. Look out for HDB-licensed firms, transparent reviews, detailed portfolios, and clear contracts. A reliable ID firm won’t just promise a good-looking home—they’ll prove it with process, professionalism, and people who genuinely care about your home. Ask about past projects and how they handle after-sales service. That’s where true reliability shows.

Scandinavian BTO Interior Design Ideas for 4-Room Flats

You may feel overwhelmed as a first time BTO owner in Singapore. You want a calm, useful home but your budget and layout limit choices.You want style and comfort that lasts. You also want a plan that works in the tropical climate and HDB rules.

This guide helps you plan Scandinavian design for a 4-room BTO flat in Singapore. It stays practical and local. It includes layout fixes, material tips, storage ideas, and budget advice.

Read on to get a clear plan you can use when you talk to a contractor. Use internal links to jump to sections, or contact us through our enquiry page at /enquiry.

What Scandinavian Style Means in Interior Design

Hero: You want a home that feels calm.
You worry your flat will feel cluttered and dark.

Guide: Scandinavian design focuses on simple shapes, useful furniture, and natural materials.
It values light, clean lines, and practical storage.

Promise: You can make a 4-room BTO feel open and calm without a large budget.
You can keep a fresh look for years.

Scandinavian design began in Nordic countries.
Designers aimed for usable, honest interiors.

Key features include clear lines and restrained decor.
The result is a space that feels calm and easy to live in.

  • Functionality — Every item has a purpose.
    Choose furniture that works for daily life.
  • Natural elements — Use light woods, plants, and stone.
    These add warmth without heavy color.
  • Light and space — Maximise daylight and avoid blocked sightlines.
    Use sheer curtains and low-profile furniture.
  • Minimalism — Reduce clutter through built in and hidden storage.
    Keep surfaces clear for a calm effect.

Tip: Use neutral tones and one accent color in small doses.
Keep textures varied to avoid a flat look.

Why Scandinavian BTO Design Suits Singapore 4-Room Flats

Hero: You own a typical 4-room BTO in Singapore.
You face size limits, corridor walls, and sometimes small windows.

Guide: Scandinavian design works with small units.
It relies on light colours, smart storage, and flexible furniture.

Promise: With careful planning, your flat will feel larger and work better for family life.
You will get a calm base that supports occasional updates without big cost.

Most 4-room BTO flats measure about 90 to 100 square metres.
The layout often has a central living area and separate bedrooms.

Scandinavian design suits this layout because it reduces visual weight.
It also supports built-in storage and multi use furniture.

Practical gains you can expect include more usable floor area and easier cleaning.
You also reduce the need to replace furniture often.

Local note: Choose finishes that resist humidity and mould.
Singapore humidity requires durable materials.

If you want a kitchen that fits the style, see our BTO Kitchen Design Ideas.
For broader trends, see our portfolio.

Floor Plan Adaptations for 4-Room BTO Flats

Hero: You worry about awkward corners and tight corridors.
You fear that opening walls will break rules or raise costs.

Guide: You can improve light and flow with small but strategic changes.
Focus on sightlines, multifunction zones, and concealed storage.

Promise: Your flat can feel more open without major structural work.
You will get rooms that serve more than one purpose.

Practical adaptations that work well in Singapore include the following.
Each item lists direct steps you can take.

  1. Open concept living and dining.
    Where HDB rules allow, remove non-load bearing partitions.
    If full removal is not possible, use slim furniture screens or low bookcases to separate zones while keeping sightlines open.
  2. Flexible multi use rooms.
    Use modular shelving and fold away desks.
    Choose daybeds that convert to seating or guest beds.
  3. Optimise circulation paths.
    Keep the main path free from furniture.
    Use built-in shoe cabinets near the entrance to reduce clutter along corridors.
  4. Bedroom zoning.
    Use built-in wardrobes with sliding doors to save space.
    Install low-profile headboards and floating shelves for bedside storage.

Tip: Map daily routines.
Place storage near where items get used.

Example: Put school bags by the door.
This reduces morning clutter.

Note: Always confirm with HDB or a structural engineer before removing walls.
Check project feasibility early to avoid delays.

Key Design Elements: Materials, Colour Palette, Lighting, Storage

Hero: You want a warm, calm home but worry about material wear in a tropical climate.
You worry about mould and warped wood.

Guide: Pick materials that look natural but perform well in humidity.
Use a controlled palette to keep the space calm and bright.

Promise: You can get the Scandinavian look while using long lasting finishes.
You can limit maintenance and keep costs predictable.

Materials

Use light woods such as birch style laminates or engineered oak.
These give wood grain while resisting moisture better than solid softwood.

Use matte ceramic tiles in wet areas for grip and durability.
Avoid too much gloss that shows stains quickly.

Choose linen and cotton for curtains that breathe.
Avoid heavy drapes that trap heat and moisture.

Colour Palette

Stick to soft whites, pale greys, and muted beige as your base.
Use one accent color like deep green or charcoal in small areas.

Paint ceilings and trims in bright white to reflect light.
Use slightly darker tones for feature walls so the room feels grounded.

Lighting

Maximise natural light with sheer curtains and minimal window obstruction.
Add layered artificial light for tasks and mood control.

Install LED downlights with warm colour temperature for living areas.
Use adjustable under cabinet lights in the kitchen for food prep.

Storage

Design built-in wardrobes and high cabinets to use vertical space.
Use concealed storage under seating or platforms for seasonal items.

Use modular shelving in study or play areas so you can change layouts as needs shift.
Label bins and boxes to keep order and speed clean up.

Case Examples in Singapore

Hero: You want proof that this works in local flats.
You want examples that match your constraints and budget.

Guide: Below are brief, real world style examples that focus on layout, materials, and budget.
Each case shows the exact change made and why it worked.

Promise: These examples show how simple choices add up to a calm home.
You can follow the same pattern in your flat.

Case 1: Bishan, 95 sqm 4-room

Issue: The living area felt boxed in and dark.
Intervention: Removed a non-structural half wall and used low cabinetry to keep sightlines open.

Materials: Ash look laminate on floors and built in cabinets with matte finish.
Result: The living area felt larger and allowed more daylight to reach the inner corridor.

Case 2: Punggol, multifunction children rooms

Issue: Bedrooms needed to serve play, study, and sleep.
Intervention: Installed modular beds with pull out desks and vertical storage.

Materials: Durable laminate, matte ceramic tile for play area, linen curtains.
Result: Each room adapted to daily needs and stayed tidy with clear zones.

Note: For more project photos and details see our portfolio at /portfolio.
Contact us at /enquiry to discuss a similar plan for your unit.

Common Mistakes to Avoid

Hero: You worry about making expensive mistakes during renovation.
You want to avoid choices that date quickly or fail in our climate.

Guide: Below are common errors and how to fix them.
Each point gives a clear action you can take.

Promise: Avoid these and your design will last longer and cost less to maintain.
You will get better value for your renovation spend.

  • Using too much white paint.
    Explanation: Pure white shows dirt. Use warm off white tones that hide wear.
  • Choosing solid softwood for flooring.
    Explanation: Softwood can warp in humidity. Choose engineered or laminate with wood look.
  • Skipping storage planning.
    Explanation: Without thought out storage you get clutter fast. Sketch storage needs before buying furniture.
  • Poor lighting layout.
    Explanation: Single overhead light makes zones dull. Add task lights and dimmers.

Budget and Material Tips for Singapore BTOs

Hero: You want a good outcome but you have a tight budget.
You need to choose where to spend and where to save.

Guide: Invest in durable finishes for floors and kitchens.
Save on decorative items and loose furniture you can change later.

Promise: With careful choices you get a calm, long lasting home without blowing the budget.
You will avoid frequent replacements that inflate lifetime cost.

Numbers to guide you:

  • Flooring — Engineered wood or quality laminate.
    Range: S$5 to S$12 per square foot installed depending on type.
  • Kitchen cabinetry — Spend on core carcass and hardware.
    Use economical door finishes like melamine or moisture resistant laminate to save cost.
  • Lighting — LED and dimmers save energy.
    Budget S$150 to S$400 for layered lighting per major living zone.

Tip: Get three quotes for any major trade.
Ask for itemised pricing to compare line by line.

How to Blend Scandinavian with Other Styles

Hero: You like some elements of other looks.
You worry mixing styles will create visual conflict.

Guide: Keep the base neutral and add small accents from another style.
Use one clear rule for contrast and stick to it.

Promise: You can personalise your flat while keeping a calm base.
The result will feel modern and lived in.

Practical mixing ideas:

  • Japandi elements.
    Use natural wood tones and low profile furniture with simple lines.
  • Contemporary touches.
    Add metal lighting or a single artwork in a bold color.
  • Tropical accents.
    Use rattan pieces and green plants for texture and life.

Next Steps and How We Help

Hero: You want a clear plan to start your renovation.
You need an actionable checklist and a trusted partner.

Guide: Follow the checklist below and get professional help early.
Early decisions reduce change orders and unexpected costs.

Promise: If you follow the steps your project will run smoother.
You will feel confident in your choices at every stage.

Action checklist

  1. Measure your flat and note window positions and orientation.
    Include the direction the main windows face to plan light strategies.
  2. List daily routines and storage needs for each room.
    Include items that need permanent storage versus seasonal items.
  3. Prioritise durable finishes for floors and kitchen.
    Choose laminated wood look flooring and moisture resistant kitchen doors.
  4. Get three contractors or interior designers to quote with itemised lists.
    Ask for timelines and warranties on workmanship and materials.
  5. Create a phased spending plan.
    Decide what needs to be done now versus what can wait to spread cost.

Contact us at /enquiry to start a consultation.
You can also view local HDB guidelines at HDB and building advice at BCA.